Backyard Toy Storage Shelf
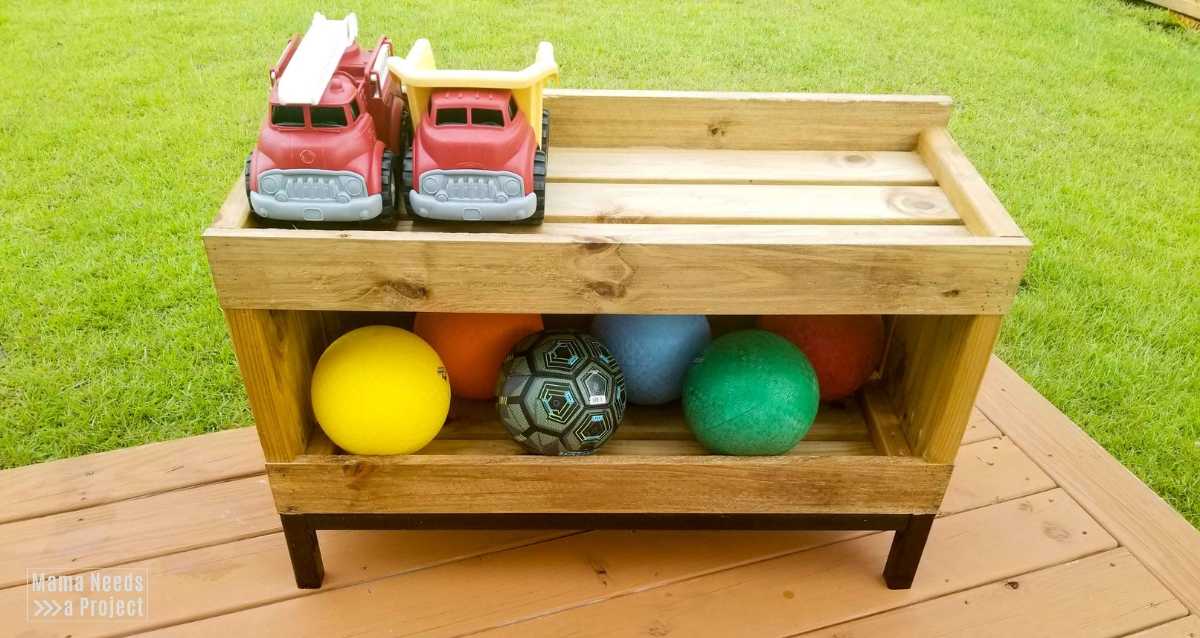
This DIY project has been on my to list for so long! I’m happy to finally have a storage solution for all of my son’s outdoor toys and balls with this Backyard Toy Storage Shelf.

Finding a better way to organize the toys in our yard was actually one of my 2019 Home Project Goals. I’ve been working my way through that list this year, and I think I actually might get everything done!
The Design
I put a lot of thought into the design of this toy shelf. The cool thing about creating your own woodworking plans is that you can build exactly what you need. Here are some of the considerations that came into play for this design:
Raised Trim – My son has a lot of balls and trucks that stay outside so to keep these things from rolling away or blowing off the shelf I put raised trim on both the top and bottom shelf.
Independent Play – Another priority for me was making sure the toys were easily accessible to my son. I worried that a traditional toy box with a lid would lead to smashed fingers or my son falling into the toy box. This open design makes it easy for my son to take toys off the the shelf, but also easy for him to put toys away all by himself.

Water Drainage – I put spacing in between the boards to allow for water to drain through when it rains. (It rains a lot here.)
Heavy Duty – And, this sucker is super heavy, making me feel confident that it won’t get blown around in the many wind storms we experience here as well.
Backyard Toy Storage Shelf Woodworking Plans
This build was a little different for me, because I created the plans before I started building instead of figuring it out as I went along. It made a huge difference in how long it took me to complete this build. Spending a couple hours creating the woodworking plans ahead of time allowed me to zip through this build in just 2 nap times. That’s record time for me.
You can grab a copy of the backyard toy storage shelf woodworking plans in my shop.
All of the woodworking plans in my shop include a lumber list, cut list and supply list. They also feature digitally rendered images and detailed instructions that walk you through each step of the build. I use easy-to-understand language that’s perfect for beginners.
What do you need to build a Backyard Toy Storage Shelf
This post contains affiliate links.
Materials
- Backyard Toy Storage Shelf woodworking plans
- tape measure
- speed square
- wood glue
- pocket hole jig (this is the Kreg Jig I use)
- 2 1/2 pocket hole screws
- 2 1/2 wood screws
- miter saw
- sander
- drill
- right angle drill (This is not the one I use, but based on the reviews and brand reputation I think it’s a good choice. You can also use a right angle adapter like this one on your regular drill)
- Brad nailer & brad nails (optional)
Lumber
I recommend using treated lumber to give this project more durability outside. I used pressure treated pine. If you use treated lumber remember to give it some time to dry out before you start building. It is usually very wet and the wood may move as it dries.
- (3) 2x4x8
- (2) 2x2x8
- (4) 1x4x6
- (1) 1x2x6
How to Build a Backyard Toy Storage Shelf
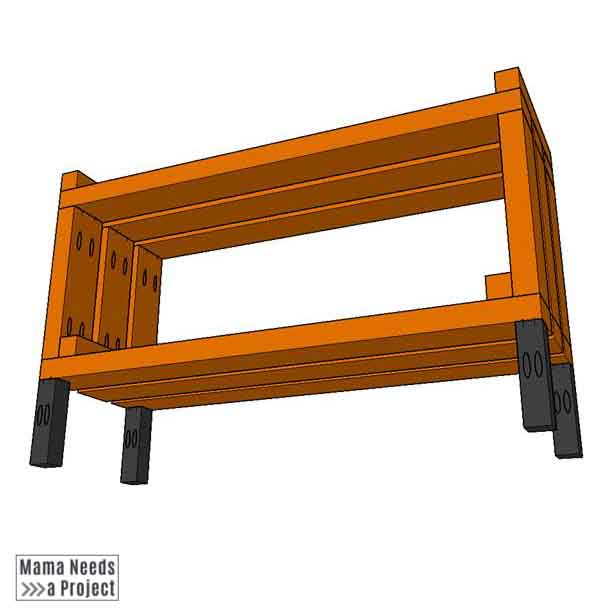
1. Build Rectangle Frames
The box of this toy shelf is made from 3 rectangle frames joined together. The rectangle frames are constructed using pockets holes. It is very helpful to have a right angle drill like this one for the assembly. It’s a tight fit for a regular drill, but my right angle drill fit without any issues.
Drill pocket holes into both ends of the (6) 12″ 2x4s.
I use a Kreg Jig for my pockets holes and it is very easy to use! Adding pocket holes to furniture I’m building definitely gives a more polished, professional look. If you’re using a Kreg Jig be sure to adjust the jig and the drill bit for 1-1/2″ thick material.


Connect the 12″ 2x4s to the 35-1/2″ 2x4s to create 3 rectangle frames. Use wood glue and 2-1/2″ pocket hole screws. Use a speed square to check that your boxes are square and make adjustments accordingly.

2. Connect the frames to make a box
Next, connect the frames using the 12″ 2x2s. Line up the 2×2 in the bottom corner of your frames, making it flush with the front and back frame. The middle frame will have a 3/4″ gap on each side. Attach with wood glue and 2-1/2″ wood screws. Pre-drill your holes to prevent the boards from splitting.
The right angle drill comes in handy again in this step.


3. Add Top Trim
Attach the remaining 2 12″ 2x2s to the top of the box. Make sure they are flush with the front and back of the box.
I attached mine using wood glue, clamps and a brad nailer. You could also attach using glue and wood screws.
I didn’t get pictures of the next few steps, so these images are excerpts from the printable Backyard Toy Storage Shelf Woodworking Plans.

4. Legs & Base Pieces
When constructing my toy shelf, I added the legs and base pieces last, but after some tweaking to the plans, I think doing this before adding the backing or trim will be much easier.
Drill 2 pockets holes in each 6″ 2×2 leg. Then, attach each leg at a corner of the box using 2 1/2″ pocket hole screws.
I first attempted to attach the base pieces using only one pocket hole per 2×2 and with regular wood screws. My boards split! Using the correct screws solved this issue. And, using 2 pocket holes per board was much more secure.
(*)After attaching the legs to the base of the box, measure the space between the legs and cut the base pieces to size. My treated 2x2s were actually a 1/4″ smaller than the standard 1.5 x 1.5 in thickness. To get a snug fit I recommend cutting the base pieces based on the measurements of your box.
Attach the 32-1/2″ and 9″ base pieces to the bottom of the box, between the legs. I experimented with using pocket holes to attach these boards to the legs and attaching them directly into the base. I found that attaching them directly to the base worked best. Use glue, 2-1/2 wood screws and pre-drill all of your holes.
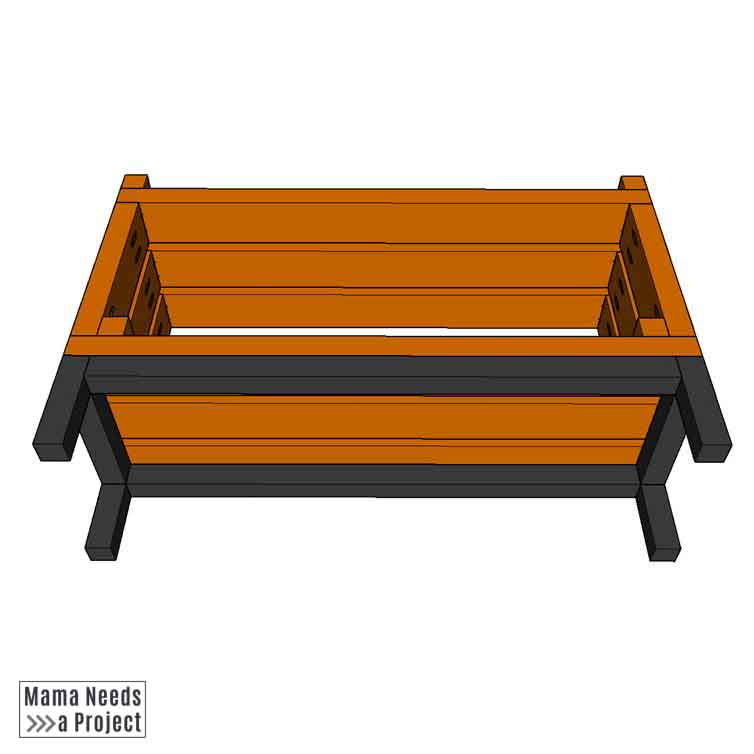
5. Add backing
Turn your box back over and attach the 35-1/2″ 1×4 backing. Start at the bottom of the box and work your way up, using 5 of the cut 1x4s. Attach with wood glue and 2-1/2 wood screws. Pre-drill your holes.

6. Add Front Trim
Finally, attach the trim to the front. For this I used wood glue, clamps and a brad nailer. You can use wood screws & glue instead, just be sure to pre-drill your holes.
Use the remaining (2) 35-1/2″ 1x4s for the top and bottom trim. Align the bottom trim with the bottom of the box. Align the top trim with the 2x2s on the top of the box.
Then, measure the distance between the top and bottom trim and cut the 1×2 side trim pieces to size.

Finishing the Backyard Toy Storage Shelf
Allow the glue to dry on your outdoor toy shelf for a few hours. Then, give it a quick sand and it’s ready for paint or stain. You can use one of these top sanders for furniture that do an amazing job.
For stain, I used Minwax Golden Oak stain on mine with glossy black paint on the base. I think the contrasting base makes it look more modern. Plus, if we decide to keep this toy shelf out in the yard the dirt and mud will blend right in with the legs. You can also check out some of these stains for pressure treated wood.

Update: After having this shelf out in the sun for a while the stain has started to fade. I recommend using an outdoor stain if your shelf is going to be an area where it gets a lot of sun and rain.
Share your Projects!
If you make this project or any other on Mama Needs a Project, please share them with me! You can find me on Instagram @mamaneedsaproject or on Facebook at the Mama Needs a Project Facebook page.