How to Fix Polyurethane Mistakes (13 Common Mistakes!)
Polyurethane is one of the most popular finishes out there, mainly because it’s strong, long-lasting, visually appealing, and easy to apply.
I use polyurethane all of the time!
But there’s nothing worse than a bad polyurethane job. Whether you’re dealing with polyurethane bubbles, brush marks, or a cloudy finish – it can ruin your project.
But don’t worry, I’ll show you exactly how to fix polyurethane mistakes and some tips to applying polyurethane finishes so you can get the best results. Let’s dig in!
Most polyurethane mistakes can be fixed by lightly sanding and applying an additional thin coat over the existing finish. To avoid a bad polyurethane job, try thinning your polyurethane before applying, and giving it time to dry between coats.
How to Fix These Common Polyurethane Mistakes
1. Bubbles
Do bubbles keep appearing while you’re applying polyurethane? It’s probably because you didn’t prep the poly or your brush properly.
If you’re using an oil-based poly, you need to soak the brush in mineral spirits before you stick it in the polyurethane; swap the mineral spirits for water if you’re using water-based polyurethane.
The reason why soaking your brush in mineral spirits or water before you stick it in polyurethane is important is because either liquid will thoroughly clean the brush bristles. And when the bristles are clean, they have a much easier time applying poly evenly.
But after you dip your brush in mineral spirits or water, you need to make sure you thoroughly remove any residual liquid. If you don’t, the polyurethane will mix with the mineral spirits or water, preventing you from being able to put down an even, 100% poly base coat.
If air bubbles are still popping up while you’re applying polyurethane, but it’s just a few here and there, simply pop them with the end of your brush and lightly brush over them until a level coat has been achieved.
If you miss some air bubbles before letting the poly dry, it’s not the end of the world. You can sand these off and re-apply polyurethane as needed.
Note: If you’re applying polyurethane to a wood surface that has remnants of silicone or wax-based polish on it, you may notice little craters while the poly is drying and mistake these for bubbles. If these craters appear, you’ll need to re-clean the surface to ensure any preexisting finish is 100% gone.
Bubbles can also be a common wipe on polyurethane problem. Be sure not to shakes the can before applying.
2. Cloudy Polyurethane Finish
Polyurethane being cloudy is usually the result of zinc oxide buildup. Zinc oxide is a flattening agent that manufacturers add to polyurethane to give it a satin or matte finish. Zinc oxide also disperses reflected light and makes the sheen less glossy.
Usually, the zinc oxide molecules pool at the bottom of the can, which is why stirring before using polyurethane is essential.
Additionally, a hazy finish could result from applying too many thick coats of polyurethane.
Or it may just be that the polyurethane only looks cloudy when drying. This happens with water-based polys more than oil-based, and most of the time the cloudiness goes away as the finish dries.
The best way to prevent cloudiness is to stir your polyurethane well before using it. This way the zinc oxide molecules don’t build up.
If you notice some cloudiness after applying a polyurethane coat, and the poly is still wet, you can go over it with a brush to clear up the cloudy spots and evenly disperse the poly.
Unfortunately, if the polyurethane has dried significantly and it’s cloudy, there’s no easy way to remedy this. Adding another polyurethane coat won’t improve the situation but actually make it worse.
In this case, you’d have to sand and remove pre-existing polyurethane before re-applying.
But before you re-apply, stir the polyurethane well, i.e. make sure you scrape the bottom of the can. Also, make sure the wood surface is clean and sanded before you apply the polyurethane.
3. Scratches
No matter how much you take care of your polyurethane, it’s going to get scratched eventually. When this happens, you shouldn’t view it as a big deal. After all, the polyurethane coats are there to protect the material underneath from getting scratched.
That said, nobody wants a polyurethane finish that’s rife with scratches, so how do you fix it?
Well, the first thing you should do is examine the scratches to see how deep they are. If they’re mostly minor scratches, you may just need to sand lightly to remove them.
For bigger and deeper scratches, first go over them with a fine grit sandpaper. Don’t sand too hard, as you may take off too much of the polyurethane.
After you lightly sand, remove the polyurethane dust that was created and wipe the surface down with a wet cloth.
Apply polyurethane to the scratched areas and make sure the surface is even overall before letting it dry. Once the surface is dry, apply another light coat; repeat this process until the deep scratches are no longer visible.
If you don’t want to be fixing polyurethane scratches often, consider using oil-based polyurethane. Of course, this kind of poly doesn’t go well with every material, so that’s something to keep in mind.
Check out my guide to tung oil vs polyurethane to find which wood finish is best for your project!
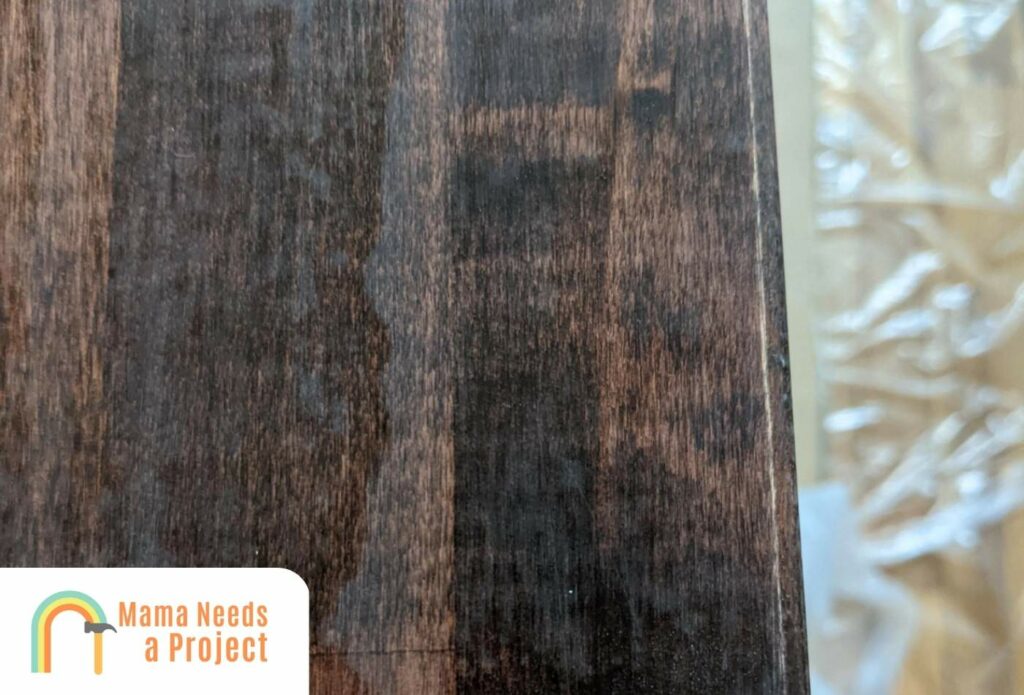
4. Uneven Finish

When you apply a base coat, or any coat really, and it looks uneven, it’s likely you didn’t apply the polyurethane properly.
That said, unevenness could also be linked to the poly you’re using. If you’re using water-based polyurethane, the chances of you getting an uneven polyurethane finish are higher, as this poly dries quicker and is therefore harder to even out.
Oil-based polyurethane, on the other hand, is easier to even out because it takes much longer to dry.
The applicator used also has a lot to do with how even the coats of polyurethane will be. Specifically, if you use a brush or roller, it’s more likely that the polyurethane coats will come out even.
Achieving even coats with a sprayer is a bit more challenging, but it’s possible if you’re good with this tool.
It can be hard to identify and fix uneven polyurethane finish when it’s wet, so you should wait for it to dry a bit before you try to identify unevenness.
When you do identify uneven spots, sand them down until the overall surface is even; then apply another polyurethane coat.
Note: Don’t forget to thin the polyurethane before applying it, otherwise you may be dealing with unevenness later on. And if the poly is especially viscous, it’ll be hard to even out.
5. Cracked Finish
If your polyurethane finish looks like an alligator’s skin, this could be a result of the wood being too moist or oily when you applied the polyurethane.
This phenomenon is known as crazing, and wet/oily woods aren’t the only causes of it.
Crazing can also happen if you applied the polyurethane when the temperature was below 55° Fahrenheit.
Additionally, if you apply a polyurethane layer to a surface and it doesn’t adhere properly, crazing is likely to be the result.
Polyurethane should be applied to a clean but rough surface, as it adheres best to such surfaces. Also, any preexisting finish should be removed before the poly is applied, as this can prevent the poly from adhering properly.
Applying thick layers of polyurethane can also lead to crazing, and applying low-quality poly often results in this as well.
You can remedy crazing by applying a solvent to the affected area. Once the brittle poly has been removed, apply new poly.
I usually use steel wool and mineral spirits to remove crazed poly. Then I let the area dry before applying a second coat of poly.
But if the whole surface resembles an alligator’s skin, and that’s usually what happens with crazing, it’s best to just take off all the polyurethane and re-apply.
When you do re-apply, make sure the temperature isn’t too cold and that the polyurethane is stirred well.
You don’t have to put too much down, and the surface you’re applying it to should be properly roughed up and cleaned.
If you adhere to all these points when re-applying poly, it’s unlikely you’ll be dealing with alligator skin again.
If you’re using polyurethane, check out these ways to get poly off your hands and these ways to clean your poly brush!
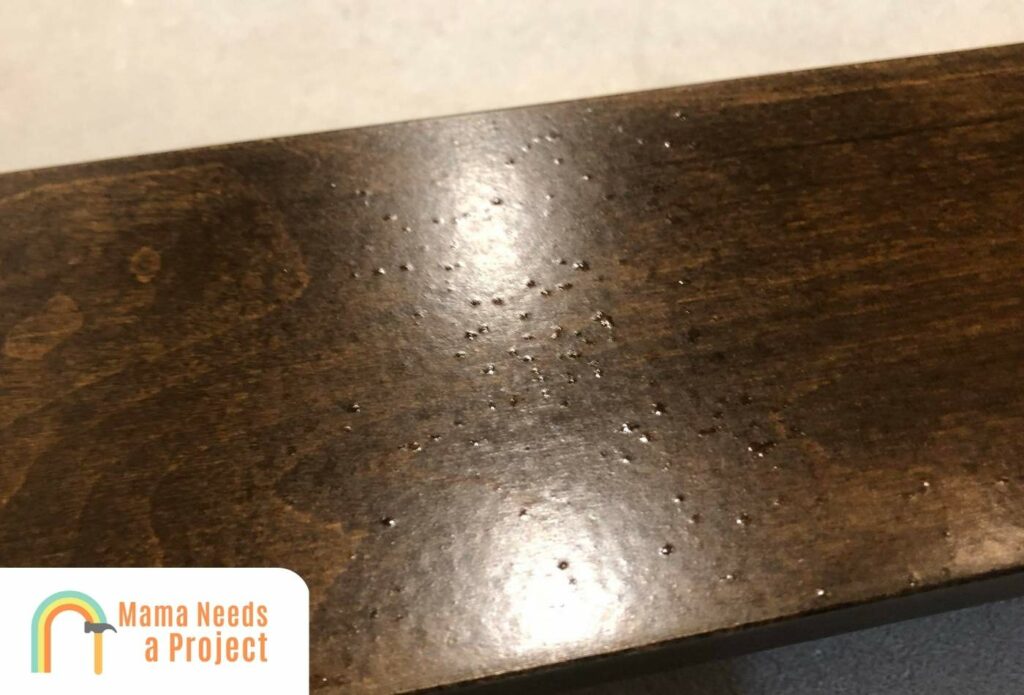
6. Puddles
Puddles are another thing that can make your polyurethane finish look and feel unattractive. And like with bubbles, many things cause puddles to show up in polyurethane.
Usually, puddles are a result of not waiting long enough before applying another layer of polyurethane. If you don’t give a coat of polyurethane enough time to dry, the next layer of polyurethane won’t adhere to it well, and puddles are likely to be what you’re left with.
Also, if you don’t lightly sand the material adequately before applying polyurethane, puddles can occur.
Generally speaking, puddles and unevenness go hand in hand, so if you see puddles, it’s likely the whole surface is uneven.
But puddles, like bubbles, are easy to fix.
If you notice puddles before the polyurethane has had ample time to dry, you can wipe these away with a rag that’s been soaked in mineral spirits.
But there shouldn’t be an excessive amount of mineral spirits. If there is, this thinner could mix with the poly and thin it, thereby causing even more unevenness.
If you applied water-based polyurethane, wait 5 to 10 minutes before you wipe down the puddles; for oil-based poly, wait 20 minutes before wiping.
After the puddles have been removed and the surface is even throughout, you can go ahead and apply the next layers of polyurethane.
And should the poly dry before you could address the puddles, you can still sand them down.
Note: If you apply multiple thin coats of polly, it’s unlikely that you’ll run into the puddling problem.
7. Peeling Finish
Like many of the problems discussed thus far, polyurethane peeling is most often the result of improper application.
Specifically, if you fail to clean the surface and remove any pre-existing finish before applying new polyurethane, peeling is something you may run into eventually.
Peeling can also be what you’re left with if you fail to properly sand a surface before applying polyurethane.
And if you apply too much polyurethane, chances are it won’t cure all the way, and the most uncured layers will peel or flake off.
After you identify peeling polyurethane, you can address it using paint thinner, 320-grit sandpaper, and mineral spirits.
Apply paint thinner to the affected area and then wait for it to soften up. Once it is, remove it and then sand down the area with 320-grit sandpaper. Finally wipe the area with minimal spirits to remove any dust and dirt before re-applying poly.
Peeling is more likely to occur with oil-based poly because it’s more viscous. That said, you could also run into peeling problems with water-based poly if you apply it improperly or fail to even it out before it starts to dry.
8. Streaks
When polyurethane is applied to a finished surface with a brush, there’s a chance that streaks will form. More specifically, streaking is more likely if you apply poly with a cheap brush that has coarse bristles.
Also, if you over-brush the poly, you run the risk of creating streaks.
A natural bristle brush is the best kind for applying oil-based polyurethane, whereas a synthetic brush should be used for water-based polyurethane.
When you brush on polyurethane, make sure you’re only brushing with the first half inch of the bristles.
Refrain from applying a lot of pressure while brushing, and do your best to brush at a 10° angle.
Going with the grain is also a good move, but not totally necessary.
Your goal should be to cover the whole surface with poly, but don’t over-brush the same spot, as this is likely to result in streaking.
Remember that you’ll be applying multiple layers of polyurethane, so you shouldn’t try to get everything squared away in one go.
Instead, aim for a light finish each time you apply poly. Eventually, after enough layers have been applied, you’ll have the protective barrier you want.
9. Orange Peel Effect
Another common problem you may run into when applying polyurethane is the “orange peel effect”.
Often this is only identifiable after the polyurethane has had some time to dry, so don’t worry if this happens on your first try; some thorough sanding will remedy the situation.
This is usually a result of the polyurethane being too thick. So to avoid it, make sure you thin your polyurethane with mineral spirits or another thinner.
The orange peel effect can also happen if polyurethane isn’t properly leveled out before it’s left to dry.
And if you apply polyurethane when the temperature is below 55° Fahrenheit, you run the risk of getting an orange peel surface. It’s best to apply polyurethane when the temperature is between 65° and 70° Fahrenheit.
Also, certain applicators are more likely to cause the orange peel effect, namely rollers and sprayers.
If you’re using a roller with oil-based polyurethane, make sure it’s a fine-nap, lambswool roller. For water-based poly, use a microfiber roller.
Use a sprayer with a 4-5” fan and spray 6-8” inches away from the surface. Also, make sure the sprayer is releasing smaller fluid tips, as these are more easily atomized.
Often the orange peel effect is a result of poor atomization, a result of the polyurethane being too viscous.
10. Blushed Finish
Blushed polyurethane is polyurethane that’s especially cloudy, but it’s not the same as the cloudy polyurethane discussed above. Unlike cloudy poly, blushed poly looks the way it does because there’s too much moisture trapped under the poly or mixed into it.
Blushing can occur if you apply polyurethane to moist or oily wood, and it can also occur if you don’t clean, de-finish, and sand a surface before applying poly.
And if you apply polyurethane when it’s humid, there’s a chance that blushing will occur.
Blushing can also happen if you apply water-based polyurethane over oil based stain.
So how is blushing fixed? Well, the first thing you should do is wipe down the blushed area with a damp cloth, preferably one that’s been dipped in alcohol, paint stripper, or another thinning agent.
Don’t exert a lot of force when wiping the area; just get the area wet.
When the blushed area is dry, go over it with 180-grit sandpaper to remove the unwanted color. Again, don’t exert a lot of force, for if you do you run the risk of taking off more polyurethane than you need to.
Now apply a new polyurethane coat and wait for this to dry. At this point the blushed area should be gone.
Note: It may take one or two polyurethane coats to get the polyurethane even with the surrounding layers.
11. Discoloration
Oil-based polyurethane tends to yellow over time, and when this happens the discoloration can affect the material underneath the poly and cause the overall surface to look visually unappealing.
But there are things you can do to avoid this unfortunate scenario.
The best thing you can do is refrain from using oil-based polyurethane. Instead, go with water-based, as with this poly you won’t need to worry about discoloration.
But there are instances when oil-based is necessary, so consider the remedies below for such instances.
First, let’s look at why discoloration happens. It’s usually caused by prolonged exposure to UV rays, moisture, dirt, and minerals.
Even if your polyurethane barrier is much yellower than it was when you applied it, there are some things you can do to remove the discoloration.
For one, you can sand until a less discolored polyurethane layer is reached. Then you’d need to apply more poly on top of it.
Or you could sand and remove the polyurethane completely before reapplying.
But if you go this route, you need to make sure you take care of the polyurethane so it doesn’t discolor again, otherwise you’ll have to do this all over again—and you’ll keep having to do this until you take the time to ensure discoloration won’t happen as quickly.
Note: Some materials, like oily woods, will exacerbate polyurethane discoloration, so refrain from applying polyurethane, especially oil-based polyurethane, to materials that’ll speed up the discoloration process.
12. Cratering
Craters are what you get when you apply polyurethane to a surface that hasn’t been properly cleaned and de-finished beforehand.
Essentially, the polyurethane only adheres to the area around the dirty spots, which makes them stick out like a sore thumb after the poly has dried.
The remedy to this situation is simple. You just have to thoroughly clean the wood and sand it properly before you apply polyurethane.
I recommend using 220-grit sandpaper or something finer at this point. You don’t want to sand too much, otherwise you’ll take off too much of the finish.
To know whether or not the crater-causing elements have been removed, run your hand over the freshly cleaned surface before you apply the polyurethane. If it’s a little rough (from sanding) but even, it’s ready for the poly.
13. Runs
Runs are what you might get if you apply polyurethane to a vertical surface. Essentially, the finish runs before drying, creating long, unsightly brush marks as a result.
Runs are different from the streaks discussed earlier, for streaks are caused by brush strokes; that’s not the case with runs.
To prevent this problem from happening, apply the polyurethane when the board is in a horizontal position.
If this is impossible, then apply the polyurethane to the vertical surface, but make sure you spread the poly out evenly and check on it as it’s drying to make sure there are no runs.
When you identify a run, sand it quickly and re-apply polyurethane accordingly to ensure a smooth finish.
How to Fix Polyurethane Mistakes on Floors
Any one of the polyurethane problems discussed above can occur with a floor that’s been coated with polyurethane.
In most cases, the solution is simply sanding and re-applying polyurethane.
Of course with a floor this will be more challenging, as it’ll be harder to achieve a totally even surface. And prepping the floor so the poly can adhere well can be tough too.
You can use a sprayer, a brush, or a roller to apply polyurethane. Making use of a T-bar applicator is also a good idea.
In the end, how well you apply the poly to the floor the first time around in large part determines how much fixing will be needed down the road.
Check out the video below to learn how to get scratches off polyurethane finished floors!
FAQs
Why is my polyurethane not drying evenly?
If your polyurethane isn’t drying evenly, it’s probably because the surface you applied it to wasn’t properly cleaned or sanded beforehand. It could also be that you applied a thick coat of polyurethane in one spot. Just even it out by sanding and re-apply poly accordingly.
How do you fix poorly applied polyurethane?
In most cases, a polyurethane coating that’s been improperly applied can be fixed with sanding. If worse comes to worse, you can always remove all the polyurethane and start from scratch.
What causes bubbles when applying polyurethane?
Bubbles can be caused by a dirty brush, over-brushing, improper polyurethane mixing, low temperature, excessive moisture, and other factors. Applying polyurethane slowing and carefully is the best way to avoid bubbles.
Will air bubbles in polyurethane go away?
Bubbles in polyurethane won’t go away on their own, which is why these need to be popped and then brushed over. It’s best to fix polyurethane bubbles right when you see them, for the longer they stay intact, the harder they’ll be to remove.
Final Thoughts
In the end, most polyurethane problems can be corrected without complete removal of the polyurethane.
That said, there are instances when all the polyurethane will need to come off, and in these instances you need to focus and be careful during the reapplication process so you don’t end up with the same results.
In short, if you thoroughly clean and sand a surface before you apply polyurethane, these two simple steps can prevent most, if not all, of the polyurethane mistakes that commonly occur.