How to Stop Water from Coming Under Door (Ultimate Guide)
No homeowner wants to see water seeping under their doors. When this happens, it can lead to a host of problems, including mold growth, structural damage, and a slippery floor.
So why does water sometimes sleep under doors? Well, usually the door’s seal being inadequate is the answer.
In this article, I’ll show you exactly how to stop water from coming under door, some tips and tricks to preventing water leaks, and much more. Let’s dig in!
To stop water from coming under a door, you’ll want to look at the doors threshold. You might need to replace it or add some caulking for a proper seal. You can also install weatherstripping along with a door sweep for greater protection.
Replace Door Threshold
If there’s water coming under your door and you don’t know why, one of the first things you should do is check the threshold.
A threshold is a strip of wood, metal, or stone that goes between the bottom of a door and the floor. For example, here is my door threshold that could use some weatherproofing!
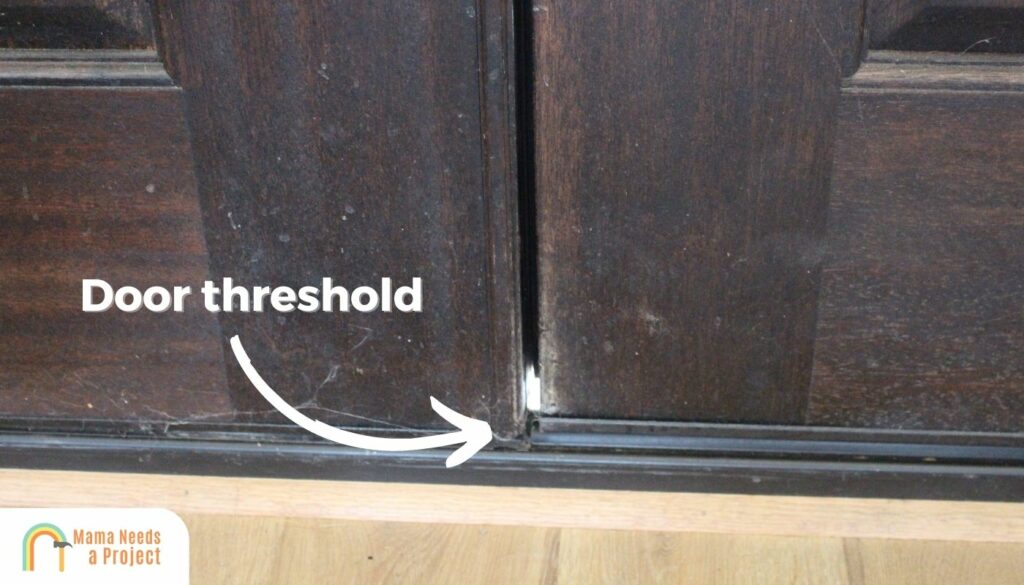
Some assume that the threshold is part of the door frame, but seldom is this the case. Although thresholds can be made of numerous materials, most modern ones are made of aluminum, bronze, brass, or stainless steel.
Before you go and replace the threshold, first make sure this is the right course of action.
It could be that water is coming under your door because the threshold you have at present—the one you want to replace—was never installed properly. In this case, you wouldn’t need a replacement; all that’d be required is an adjustment so the threshold sits properly.
But if need a door threshold replacement, here’s what you need to do.
First, you need to get required tools in order. You should gather required tools before you begin the job so you don’t have to stop midst working to visit the hardware store. It’s not a big item list, but everything on here is essential:
- A drill
- Drill bits
- A caulk gun
- Caulk
- Screw gun
- Screw fasteners
- A mop
- A vacuum cleaner
- Clean cloth or paper towels
- Sealant
Step 1: Clean the Area
It’s important to do prep work before you replace a door threshold, especially if you discovered the problem the unfortunate way, like watching water rush in under the bottom of your door.
It’s critical to make sure this area is dry and debris-free before you execute a door threshold replacement. Therefore, get rid of dirt that’s built up and make sure the area is totally dry.
You’ll need to apply caulk and sealant during the threshold installation process, and for either to be effective and long-lasting, the area has to be dirt- and moisture-free.
Using a mop to get rid of dirty water and grime is a good move.
Step 2: Remove the Threshold
Once the area is ready, it’s time to get rid of the old door threshold. Simply unscrew the fastening screws to remove the plate. Once it’s out, clean the area underneath. Using a vacuum can be super handy.
Step 3: Drill Pilot Holes
After the old threshold is gone and you’ve cleaned under it, you’ll need to drill pilot holes through the new threshold plate. These holes should be at least six inches apart, and they’re drilled to help the threshold stay in place.
After drilling holes in the plate, drill more holes in the floor that the threshold will sit atop. These holes have to be perfectly aligned to ensure a precise fit. For this reason, it’s best to use the same drill and drill bit when making all pilot holes.
The type of material and the drill bit you use collectively determine the nature of the holes. Since this is the case, it’s best to use a standard drill bit for wooden surfaces. If the surface is metallic, you’ll need a titanium drill bit. For concrete or stone, a masonry drill bit will do.
Step 4: Apply Caulk
At this point, it’s wise to apply caulk to the bottom of the threshold. Caulk can be purchased at your local hardware store or online for less than $10.
It’s best to use transparent caulk; with this you won’t have to worry about your door looking strange after the caulk has been applied.
Applying caulk to the lower part of the door threshold should make it watertight.
Step 5: Install the New Threshold
Now it’s time to install the new threshold. To do this, you’ll need the screw gun and some screw fasteners. Drive the screw fasteners through the holes with the gun.
When you’re driving, ensure that you’re doing so vertically; if you drive at an angle there’s a chance you’ll leave gaps through which water can seep.
When you’re fastening screws, you may notice some of the caulk you applied earlier seeping through the holes. If this happens, just wipe it off with some a clean cloth or some paper towels.
If the new threshold is too low and therefore can’t effectively close the gap, you should install shims on the floor before putting the new threshold down. This way the threshold is up higher after installation is complete.
Step 6: Apply Sealant
You’re almost done—you just need to apply sealant. Liquid rubber sealant is best for this job.
You should spray the inner part of the threshold as well as the edge where the caulk was applied.
It’s best to use a sealant that dries quickly for a few reasons. A quick-drying sealant won’t only get your job done faster—it’ll also ensure the seal cures properly before temperature fluctuations or the elements have time to negatively affect this process.
Need more help? Check out the video below!
Apply Weatherstripping
Even if your threshold is installed properly, there may still be a small gap between it and the floor. If this is the case, installing weatherstripping is a smart move.
Usually the gap between the top of the threshold and the bottom of the door is 1/8 “, and the weatherstripping would fill this gap. Here’s how:
Step 1: Assess the Current Weatherstripping
First, check the weatherstripping you have at present. If it’s cracked or loose, it’s best to replace it, as worn-down weatherstripping doesn’t deliver and effective seal. It’s similar to how the windshield wipers on your car start to become ineffective over time.
Step 2: Pull the Weatherstripping Off
You should be able to pull the weatherstripping off with your fingers. Especially if the weatherstripping’s adhesive is old, it shouldn’t be hard to peel it from the door.
Note: If you’re having a tough time getting the weatherstripping off with your fingers, use a knife or a flat-head screwdriver.
If it seems to be stuck when you’re peeling it, there’s a good chance it’s fastened by nails or screws. In this case, you’ll have to pull out the nails or screws that are holding the weatherstripping in place.
Once the weatherstripping has been removed, you need to thoroughly clean the area where it was. If this area is clean, it’ll be easier for the new weatherstripping to adhere to the door.
Note: If it’s hard to remove the dirt from the lower part of the door, you should take the door off its hinges and clean it when it’s flat.
Step 3: Take Measurements
Now it’s time to take measurements. With these, you can ensure your weatherstripping is the right size.
Use a tape measure to get the width of the door; remember to measure just the door (not the door plus the frame). Weatherstripping should also be applied to the sides of the door, but for now let’s stick to just weatherstripping the bottom part.
Step 4: Apply the Weatherstripping
If the weatherstripping you purchased comes with installation instructions, and most do, follow these closely.
Also, you shouldn’t apply weather stripping if the temperature is below 20°F, as the weatherstripping won’t stick properly when it’s this cold.
And you should apply the weatherstripping when the door is off its hinges, as this way you have the best chance of installing it precisely. Once the weatherstripping has been added, you can put the door back on its hinges.
Step 5: Fasten the Weatherstripping
To ensure that weatherstripping is properly fastened, drive nails or screws into it.
Step 6: Ensure Usability
Now all you have to do is ensure the door opens and closes without restriction. If there’s no restriction, this means the weatherstripping has been installed properly.
Check out the video below for more help!
Consider Door Sweeps
Installing a door sweep could also prevent water from seeping underneath your door. And if you install one of these in combination weatherstripping, there’s a very good chance you’ll create a watertight seal.
But in order for a door sweep to work effectively, it needs to be installed properly, especially if it’s being installed on an exterior door. Follow the steps below to properly install a door sweep on your door.
Step 1: Take Measurements
The first thing you should do is measure the gap between the door and threshold. The measurement you get here will indicate what size door sweep you need.
Step 2: Select a Sweep
After you know how big the door sweep needs to be, decide on which to use. There are two main options: a U-shaped sweep and a metal sweep. They usually sweep all going to the dormers metal strips are fastened to the bottom of the door.
Note: U-shaped sweeps slide under the door and are easy to install; metal sweeps require mounting with screws or nails.
Step 3: Install the Sweep
If you’re installing a U-shaped sweep, just slide it under the door. But if you’re installing a metal sweep, it’s best to take the door off the hinges before you fix the sweep to it.
Step 4: Make Sure the Door Is Usable
The last thing you should do is test the door to see if it opens and closes correctly. If not, this means the sweep isn’t installed properly and you’ll have to adjust it.
Why Is Water Getting Under My Door?
A variety of things may explain why there’s water seeping through the bottom of your door, but I think it’s wise to first address an issue that doesn’t have anything to do with your door’s soundness or position.
Specifically, if you’re dealing with a flood—like a flooded bathroom or a laundry room—there’s going to be some water seepage, unless there’s a 100% seal—which is hard to achieve.
Now if waters seeping under your door and there’s no flood causing this, the problem may be due to sealant around door being worn down. It could also be that the caulk around the door has worn down, or perhaps the weatherstripping is worn down.
There could also be a problem with the door threshold. Perhaps it’s not installed properly, or maybe you have the wrong threshold for your door.
In any of the cases above, the solution is simple and you can implement it yourself.
FAQs
How do you stop rain from coming through the bottom of a door?
To prevent rain from coming through an exterior door, you should install new weatherstripping, a door sweep, or a new threshold to improve the door seal. A door that’s properly sealed should be rainproof even if it’s raining heavily.
How do I stop water from coming under my door frame?
If you’re worried about water getting under the threshold and affecting the door sill, then you need to do what you can make the door waterproof. Improper installation of the threshold often leads to the door sill being exposed to water, which means that simply adjusting the threshold or replacing it should be enough to keep the door sill protected.
Final Thoughts
In the end, water sleeping under the door is (in most cases) due to the door’s seal being inadequate.
To improve your door’s seal, you can adjust your old threshold or install a new threshold; install new weatherstripping, or add a door sweep. If exterior metal doors are giving you a hard time, any of these solutions will do.
Last but not least: Remember that it’s important to take precise measurements, regardless of the solution you choose, to ensure the door is still usable after you’ve improved the seal.