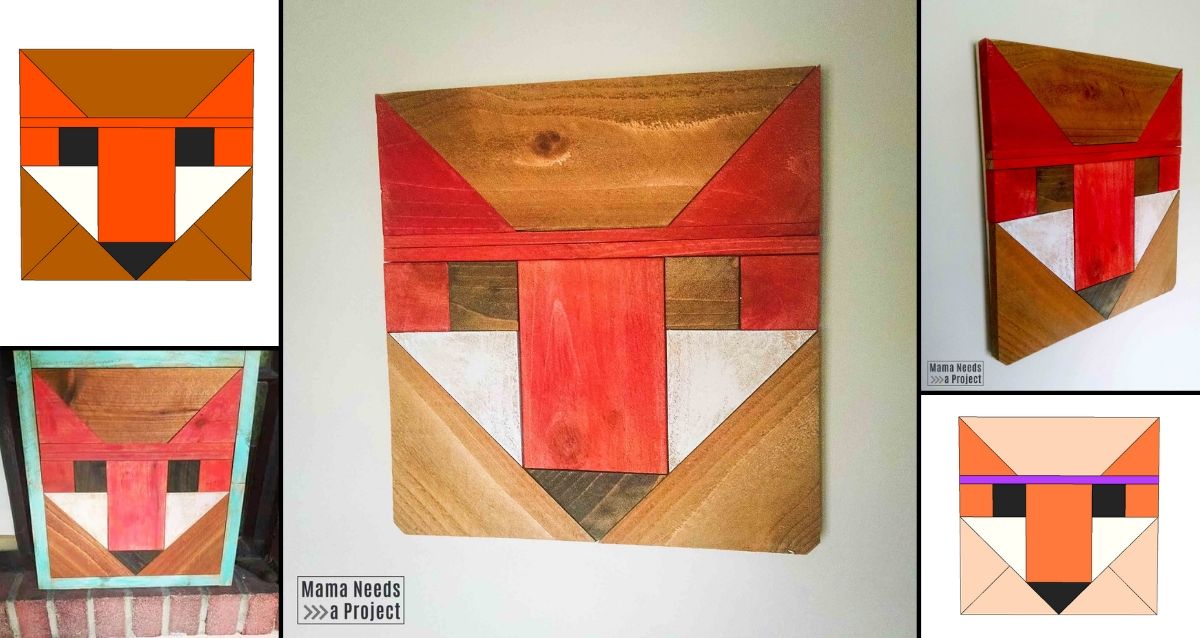
Fancy Fox Wood Quilt Block
I have always been inspired by fabric and this Fancy Fox Wood Quilt Block is my ode to the quilting world!

A few years ago I ran an Etsy shop and my Fancy Fox Wood Quilt Block was one of my favorite pieces to make. It’s playful and so stinkin cute! I sold a few variations of this wood quilt block and kept my original fancy fox for myself.
This post contains affiliate links.
Traditionally wood quilt blocks follow traditional quilt patterns like the big barn quilts you might see on the side of buildings. I love the thoughtfulness that goes into piecing together a quilt block and I see so many similarities between quilting and woodworking. Quilting is so artistic and I want to bring more of that into my woodworking.
That’s when I spotted the Fancy Fox quilt pattern designed by Elizabeth Hartman floating around on Pinterest. It was the perfect playful quilt block pattern to model my wood quilt block after!
(If you’re a quilter, or just want to be inspired by some amazing patterns, check out elizabethhartman.com. Her patterns are so playful and fun. I seriously love them all!)
Pin for later!

Taking the image of the Fancy Fox Quilt Block and creating a wood quilt block was harder than I thought! But, after lots of trial and error (and math!) I finally got all of the pieces just the right size and, holy cow this little guy is cute!
I have a cut list and pattern for the Fancy Fox Wood Quilt Block available in my resource library! To download the printable woodworking pattern, please fill out your information below.
Fancy Fox Wood Quilt
You can get all of the details to make your own Fancy Fox Wood Quilt in my resource library. I have done all the math for you and have plans available for a 12″ x 12″ wood quilt block. You can print out a cut list and pattern for piecing together your fancy fox in the free resource library.
Here is some more information to make sure your project goes smoothly.
Supplies
- Fancy Fox Wood Quilt Pattern
- Plywood backing (1/4″ thickness)
- Scrap wood pieces
- Wood glue
- Pin nailer & pin nails (or brad nailer)
- Miter saw
- Table saw
- Safety gear
- Wood stain and/or paint
Choosing Wood
This project can be made using any type of scrap wood or even a variety of wood. The pieces are fairly small and you can probably get away with just using cut offs from your other projects. Aren’t free projects just the best?
When I sold the Fancy Fox Wood Quilt Block on Etsy I used cedar fence pickets for the quilt block pieces. I chose cedar fence pickets because they are inexpensive and very lightweight. I also had lots of scraps from all of the Wedding Centerpiece Boxes I was making.
The backing of the quilt block is a thin piece of plywood. I used 1/4″ thick plywood that I had leftover from making DIY wainscoting in my Budget Bathroom Update. If you use a thicker plywood just keep in mind that it will show on the sides.
In the original Fancy Fox Wood Wood Quilt Block I left the sides unframed. But you can easily add a frame like I did for the variation below. The frame covers up the view of the plywood backing from the sides and gives the finished piece a more professional finish.

Cutting the Wood Quilt Block Pieces
The printable pattern for the Fancy Fox Wood Quilt Block has some pretty small pieces. Use caution when cutting those little pieces!
Use a table saw first to rip your scrap wood to the right width for each pattern piece. Start with the widest pieces. Then, use a miter saw to cut the angles. The only angle in this pattern is a simple 45 degrees.
All of the triangles are right triangles. The easiest way I have found to cut these is to first rip the wood to the correct width on a table saw. Then, set your miter saw to a 45 degree angle to cut a triangle off of the end of the strip. I hold onto the wood on the left side of the saw blade and the triangle is cut on the right side of the blade. This keeps my hands from getting too close to the saw blade when cutting the small pieces.

Paint and Stain
Paint and stain your wood quilt block pieces before assembly. It is so much easier!
I made my little foxes pretty traditional looking, but I put together a couple fun variations that I think would look great! Obviously I think Karate Fox is hilarious. I couldn’t decide if he was going to do karate or Jazzercise.


Put it all together
After you have all of your pieces cut and painted or stained, it’s time to put this fancy fox together!
First, layout all of your pieces according to the pattern. Make sure everything fits together nice and snug. Make adjustments if you need to.
Once you’re happy with how your pieces fit together you can start assembly.
Cover your plywood backing with wood glue. Be generous with the glue! The wood glue is what is going to hold your Fancy Fox Wood Quilt Block together.
Add all of your pieces on top of the glue. Then, start nailing pieces down with either a pin nailer or brad nailer. Once all of the pieces are nailed down, let it dry for a few hours. I like to add some heavy stuff on top while it’s drying just to make sure I get a secure hold.

A few extra tips
- If you don’t like the look of the little nail holes in your wood quilt block you can cover them up with stainable wood filler. Once the filler is dry you can paint or stain right over it to hide the holes.
- I used these sawtooth hangers on the back of my Fancy Fox Wood Quilt Block for hanging.
- Sand your wood before you cut it into the little quilt block pieces – it’s so much easier!
Fancy Fox Wood Quilt Block
This sweet little fox is perfect for a nursery or children’s room. Different paint and stain finishes can give it a million different looks to fit whatever woodland creature vibe you’re going for.
I love this little guy, and I would LOVE to see your variations! Please, please share them with me on Instagram by tagging @MamaNeedsaProject or share them to the Mama Needs a Project Facebook page.
Happy building friends!
If you have any questions about this project, please leave them in the comments and I’ll get right back with you.