What Happens if You Stain Pressure Treated Wood Too Soon?
Because of its built-in resistance and durability, pressure-treated wood is a common material to use with decks, patios, and other outdoor projects exposed to the elements.
Typically, pressure-treated wood has a dull, green color that can take away from the appearance of your deck or patio. And because of this, it’s common to stain pressure-treated wood after it gets installed to make it the color and tone you prefer.
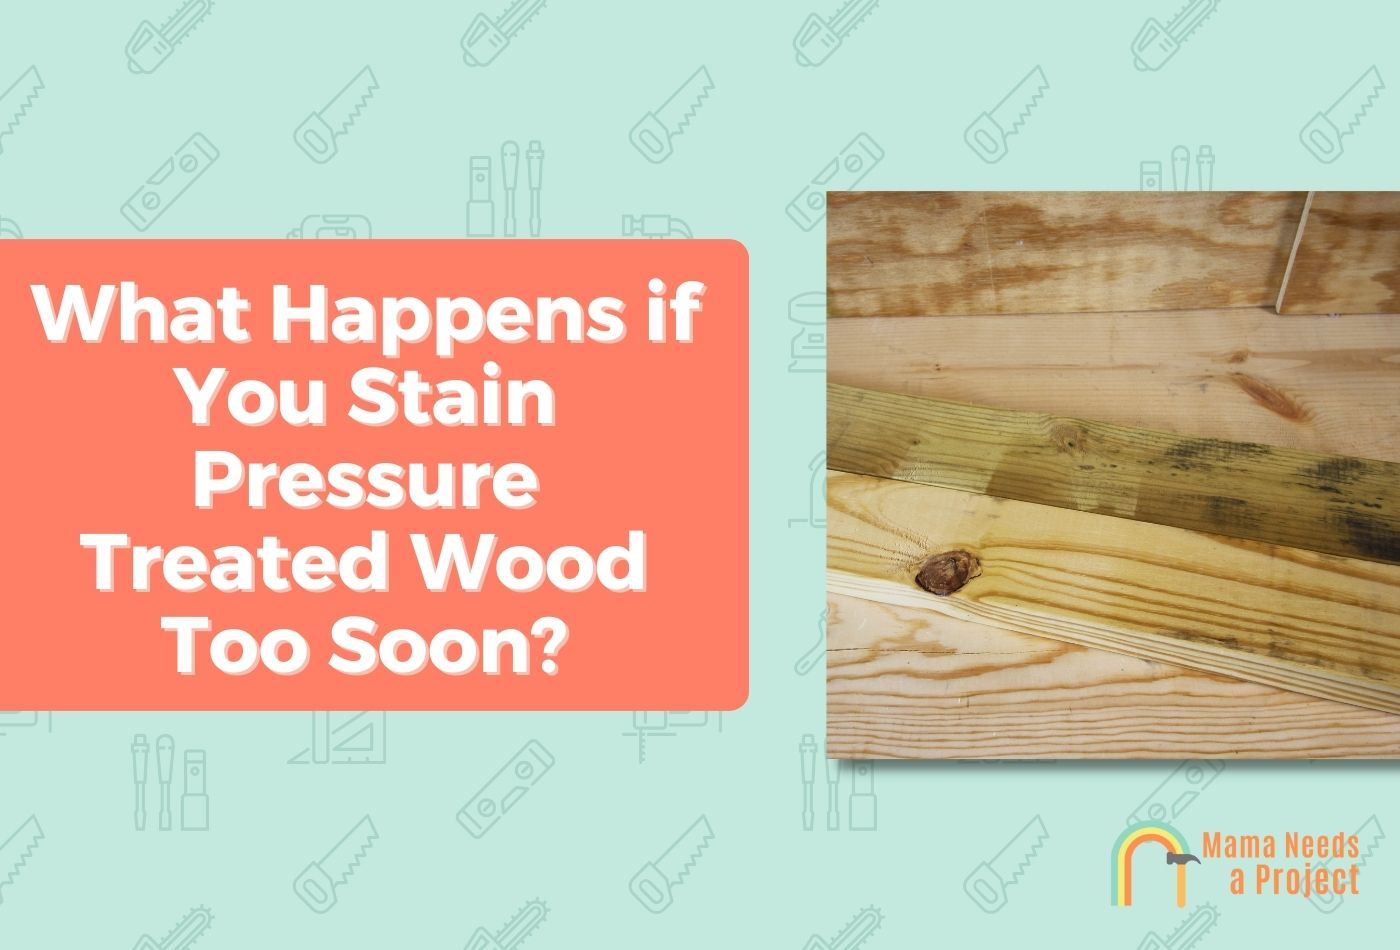
However, you should never try to stain pressure-treated wood too soon otherwise, you risk ruining the wood, wasting your stain, and creating an ugly deck for yourself.
So, what’s the result of staining pressure treated lumber too soon? Let’s find out!
What Happens if You Stain Treated Wood Too Soon?
Unlike other types of wood, you can’t stain pressure-treated lumber right out of the gate. Manufacturers use a combination of air and water to force preservatives into the wood, which is why it’s called pressure-treated lumber. This process gives it a very high moisture content that you have to consider before staining.
If you do attempt to stain it, the stain cannot penetrate the wood and it won’t give you any protection.
In addition to your stain being useless on wet, pressure-treated wood, it will also create an ugly, patchy pattern on the surface of the wood. It’s also more likely to split, crack, and splinter than if you hadn’t stained it in the first place.
How Long Should You Wait to Stain Pressure Treated Wood?
The waiting period for staining pressure-treated wood varies widely depending on the type of wood, your climate, and how long ago the wood was treated. Sometimes, the wood is dry and ready to stain in one to two weeks, but it varies.
At other times, however, it can take up to three months before pressure-treated wood is dry completely and ready to stain.
Can You Stain Pressure Treated Wood?
Just because you can’t stain pressure-treated wood immediately doesn’t mean you can’t stain it all. You simply have to wait until it’s completely dry so that the stain can penetrate the wood and have the desired effect.
In fact, not only is it possible to stain pressure-treated wood, it’s recommended.
Through the pressure-treating process, wood gets preservatives injected into its core. These chemical preservatives guard against rot, UV rays, and other potential problems that the weather throws its way. However, these preservatives wear out over time, and the wood becomes as vulnerable as any other type.
In addition to this vulnerability, pressure-treated lumber is notoriously ugly unless you like dull, green wood, and staining it is the best way to improve its looks. This is especially important with a pressure-treated wood deck or patio.
Is it Better to Paint or Stain Pressure Treated Wood?
Paint and stain are each used to add a coat of protection to wood furniture, flooring, and other projects. While they do the same thing and fulfill the same purpose, some people strongly prefer to use stain over paint and vice versa.
The long and short of it is that paint offers a thicker coat of protection and more color than stain. However, a lot more prep work goes into painting pressure-treated wood than staining it. As such, even though you’ll have to restain the wood more often, it’s faster and easier to apply than paint.
Ultimately, it largely comes down to personal preference, but my general suggestion is that staining pressure-treated wood is better than painting it.
Other Mistakes You Can Make When Staining Pressure-Treated Wood
In addition to staining pressure-treated lumber too quickly, there are other mistakes you can make during the staining process.
Choosing the Wrong Stain
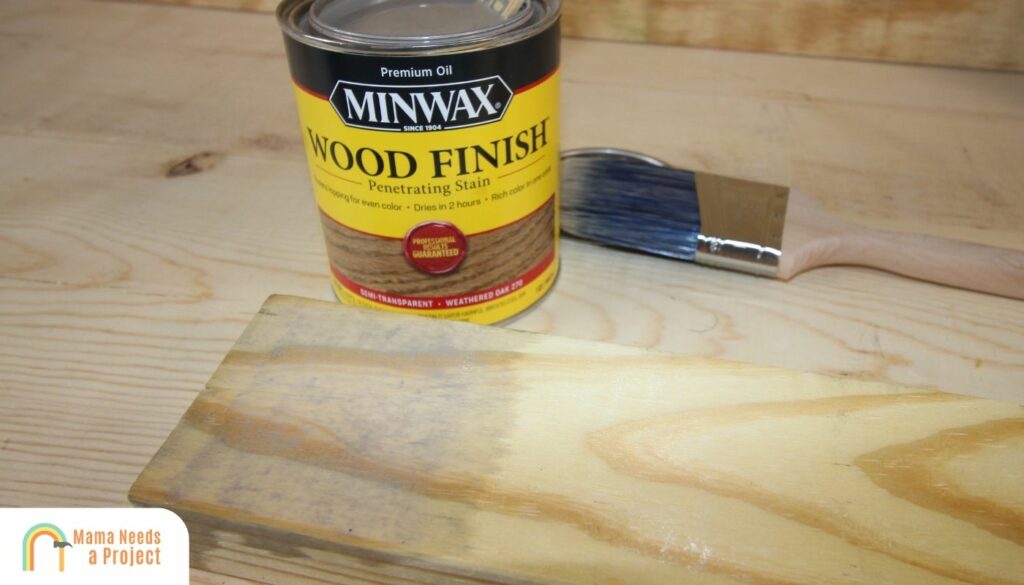
Not all stains are capable of penetrating the rough exterior of treated wood. Because of this, it’s important to do your research and choose a stain approved for outdoor use, deep penetrating, preferably oil-based, and the right color for your preferences.
Adding Too Many Coats
Contrary to what you might think, more coats don’t necessarily equate to better protection for treated wood.
In fact, adding too many coats of stain can do more harm than good and lead to a blotchy, uneven stain job due to poor adhesion. Therefore, it’s important to read the instructions on your stain of choice and apply the recommended amount of coats.
How to Stain Pressure Treated Wood Properly
1. Perform the Sprinkle Test to Ensure the Wood is Dry
As we’ve repeated many times, it’s absolutely paramount that your wood is completely dry before you try to stain it. Staining pressure-treated wood that hasn’t completely dried out is pointless and could cause damage.
There are several ways to determine if your wood is dry enough to stain, starting with the sprinkle test. Here’s how it works.
- Use a cup of water or a hose to drip small water beads on the surface of the wood.
- If the water beads remain solid and sit on the surface, your wood is still too wet to stain.
- If, however, the water soaks into the wood and disappears within 10 minutes, your wood is dry enough, and you can stain away.
Although this test is very simple, it will often tell you what you need to know. If you need further assurance, here are a few additional tests you can try.
The Nail Test
As the name implies, you’ll need a hammer and a nail for this test. Simply pound a nail partially into the wood and see if water emerges. If water oozes out around the nail, your wood is definitely too wet to stain.
Use a Moisture Meter

If you’re still not satisfied with these homemade tests, you can test your wood’s moisture content with a moisture meter. This is the most accurate way to know whether or not your wood is dry enough to stain.
To use a moisture meter, simply turn it on, switch it to the right wood setting, and press it against the surface of the wood. When it first arrives at the lumber yard, pressure-treated wood will have a moisture content upwards of 75%. Before staining it, the moisture content must be lower than 19%, with an ideal reading between 12% and 16%.
2. Choose the Right Day For Your Project
As with a painting project, you must choose the right day to stain pressure-treated wood. A warm, sunny day is ideal, but as long as it isn’t raining and isn’t supposed to for at least a day, you should be good to go.
Many stains are considered “rain safe” in as little as 30 to 60 minutes, but the longer it can sit, the better. Giving it at least 24 hours to cure is ideal, so check the weather forecast before you start your project.
3. Choose Your Stain

If you haven’t done so already, it’s time to choose the correct stain that you want to apply. As we said before, choosing a deep penetrating wood stain approved for outdoor use is important. While oil-based stains are preferred for treated wood, you can optionally use water-based stains.
As far as color is concerned, it’s entirely up to you. Just keep in mind that a transparent stain or semi-transparent stain won’t change the color very much, and neither will a water-based stain. Therefore, unless you like green decks, choose a dark or semi-dark oil-based stain.
4. Clean the Wood and Let It Dry Completely
If you’re staining the wood for the first time, cleaning it is unnecessary. However, if you’re restaining pressure-treated lumber, wash it with a garden hose and soapy water before you stain it. If you go this route, give the wood at least 24 hours to sufficiently dry before you stain it.
5. Mix, Test, and Apply the Stain
If the wood is clean, dry, and seasoned, you’re ready to start staining it, and here’s how.
- Vigorously mix your stain to keep the components from separating. As with paint, you may need to continue mixing periodically throughout the staining process.
- Apply the stain to a single piece of wood, preferably not a visible part of the deck. If you’re happy with the result, you can continue applying the stain.
- The best way to apply stain is with a paint pad applicator or a paintbrush. Avoid using rollers, as this could create a bubbly coat that takes away from the wood’s natural look.
- Apply at least one coat of stain, being careful to avoid brushing or staining the same area twice. Even a backstroke over the same area can result in an uneven coat.
What to Do If I Applied Stain Too Soon
If you were too impatient and applied stain before the wood was sufficiently dried out, it’s inconvenient, but it isn’t the end of the world. If you used a light-colored stain, simply wait for the stain and wood to dry, then add a second coat.
If you use a dark-colored stain, you will need to remove the stain using a sander or chemical paint stripper. Once the wood is clean and completely dry, you can add another coat of stain.
Here’s is an excellent guide on how to stain pressure treated wood properly.
FAQ
How long does it take for pressure-treated wood to dry?
Pressure-treated wood can take anywhere from several weeks to a few months to dry completely.
How do I know when my pressure-treated wood is dry?
Because there’s such a wide timeframe for pressure-treated wood drying time, it’s important to use the water or nail test to ensure it’s dry enough to stain. It’s also a good idea to check the wood with a moisture meter to be sure it’s adequately dry.
Final Thoughts
Although it’s perfectly okay and beneficial to stain pressure-treated wood, you must give it plenty of time to dry first. Otherwise, you’ll end up with a splotchy, incomplete coat of stain that won’t protect your wood because it’s unable to penetrate it.
However, by letting the wood dry completely and following the stain application instructions in this article, your pressure-treated deck will be beautiful and protected from anything that gets thrown its way.