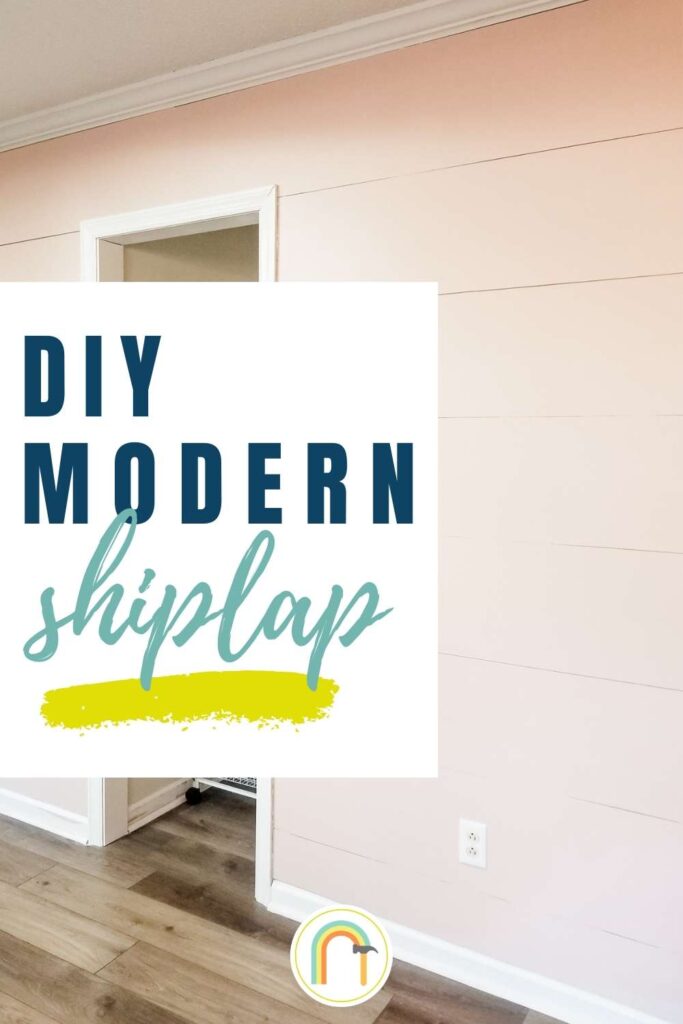
DIY Modern Shiplap Wall
This DIY modern shiplap wall is one of the very first projects I’ve tackled in our new home. It’s inexpensive, easy to do and add so much character to our very boring home. (We’re working on that boring part!)
When my husband first suggested a shiplap wall (yep, it was his idea!) I was hesitant to agree. Many of the shiplap walls I’ve seen are more of a rustic style and that isn’t what I wanted for our kitchen. But I did like the idea of adding some texture and interest with a wood plank wall.
So instead of a traditional thin shiplap like I had seen in rustic farmhouse decor, I decided to go for a wide plank wall to create a more modern shiplap look. I also decided to cover up seams between the boards so that each wood plank looked like one long piece spanning the whole wall. I really love how it turned out! And I think these features definitely made it look more like a modern version of a shiplap wall.
Like I mentioned above, this project was easy and inexpensive – my two favorite things for DIY! I’ll share with you below just how we did it.
DIY Modern Shiplap Wall
Tools & Materials
- circular saw
- 4×8 sheets of underlayment sheets (super thin plywood)
- Corner caps
- Finish nailer
- Wood filler
- Sandpaper
- Jigsaw
- Primer
- Paint
Estimated Project Time
I built our DIY modern shiplap wall over several days. It can definitely be completed in a weekend or even in a single day (if you don’t have to take breaks for babies and kiddos).
Estimated Project Cost
Overall I estimate this project cost is less than $50. It’s getting harder to estimate project costs with lumber prices rising so rapidly in the US. Luckily the lumber for this project (4×8 sheets of underlayment) is very inexpensive. It cost around $13/sheet when I bought mine.
Skill Level
The skills needed to make your own modern shiplap accent wall are pretty basic. You will need to be comfortable using a circular saw to cut down the sheets underlayment. You will also need to use a jigsaw to cut holes in the wood planks for outlets and around doorways.
How to make a homemade modern shiplap wall
1. Cut the sheets of underlayment into strips
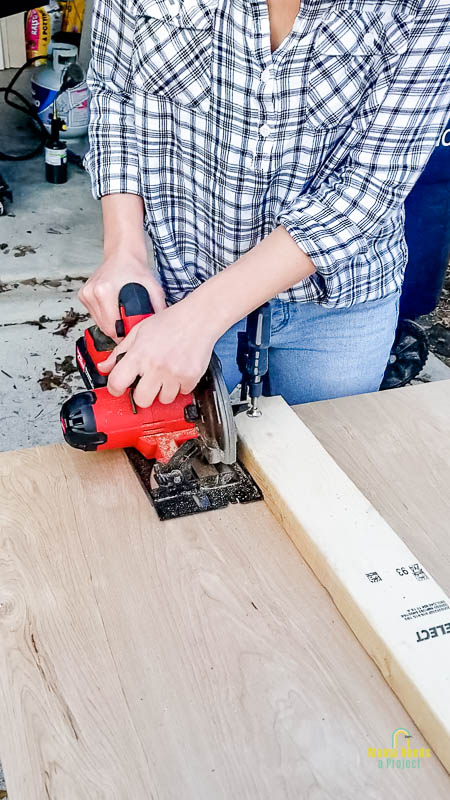
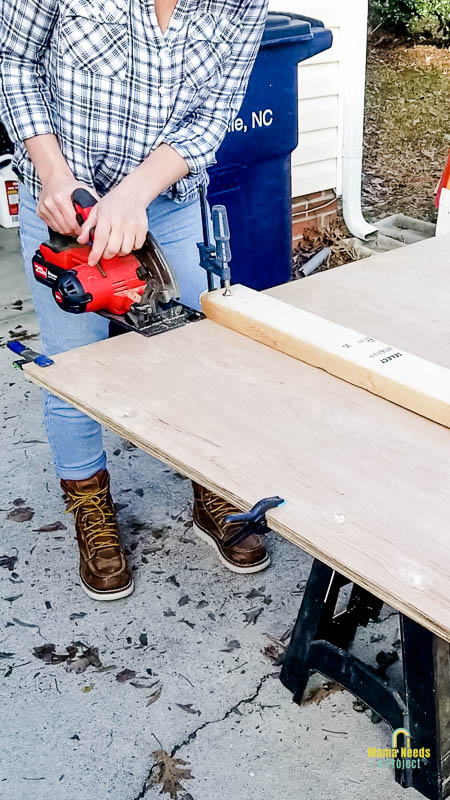
The first thing I did was cut the sheets of underlayment into 12” wide strips using a circular saw. My husband helped with this step by keeping the wood level while I cut and it was definitely good to have a second set of hands.
How to cut thin plywood with a circular saw for a DIY modern shiplap wall
- First set up two sawhorses with a scrap piece of wood across them like a table top. Then place your sheets of underlayment on top.
- Next, clamp your sheets of underlayment together so you can cut multiple planks at once.
- Next you will need to set up a guide for your circular saw. This is just a straight board clamped to the underlayment that you can use to guide your cut with the circular saw.
- After you have your guide in place you’re ready to start cutting with your circular saw. At this point it’s helpful to have a second set of hands so that someone can ‘catch’ the cutoff while you finish sawing the board.
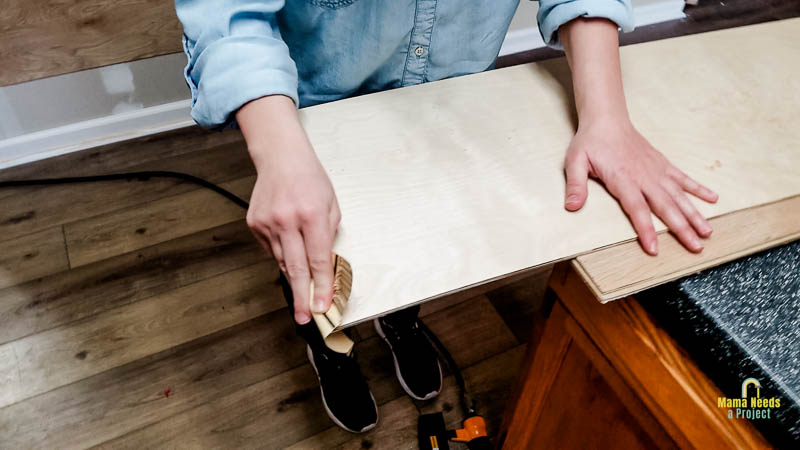
2. Sand
After cutting the underlayment down into planks for DIY shiplap you might notice some splintering on the edges of the wood planks. Give the edges a quick sand to knock off any splintered pieces of wood and smooth out the edges. I like to just use a folded up sheet of sandpaper for this, but you could also use a sanding block.
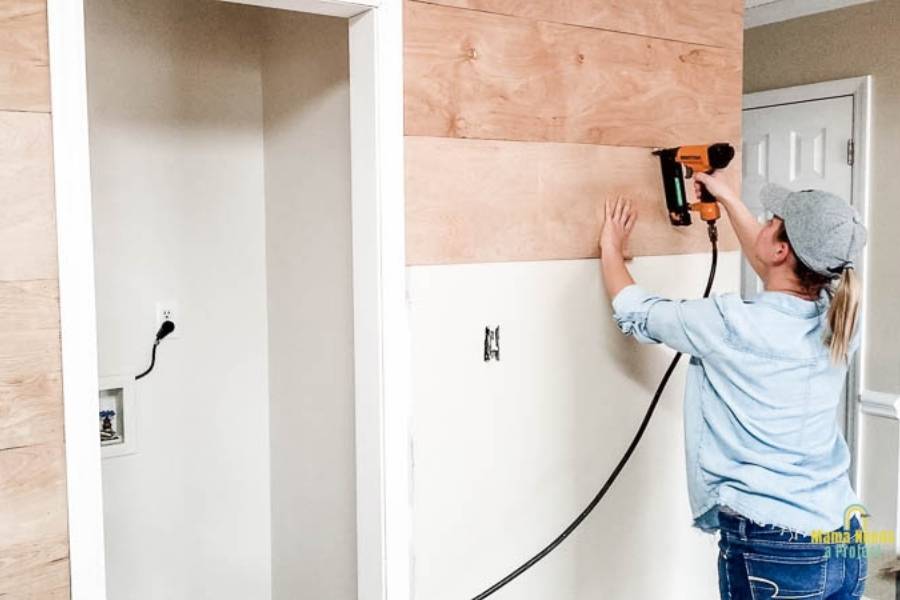
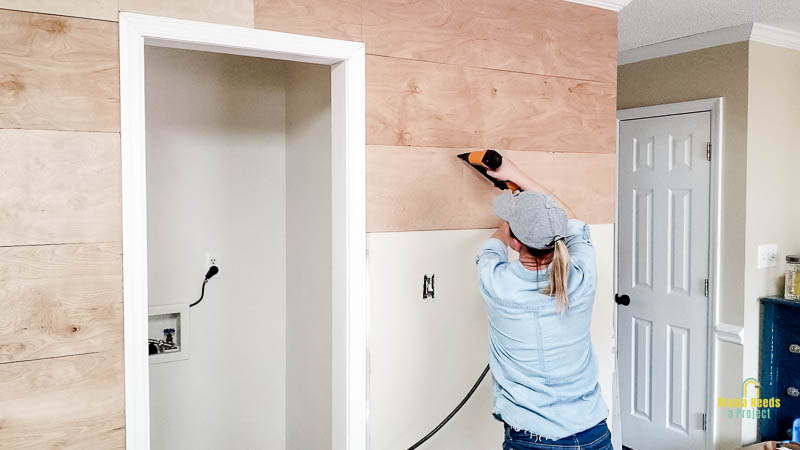
3. Attach to wall with a nail gun
Now you’re ready to go ahead and start attaching the planks to the wall. Start at the top of your wall and work your way down attaching the planks to the wall using a finish nailer or brad nailer.
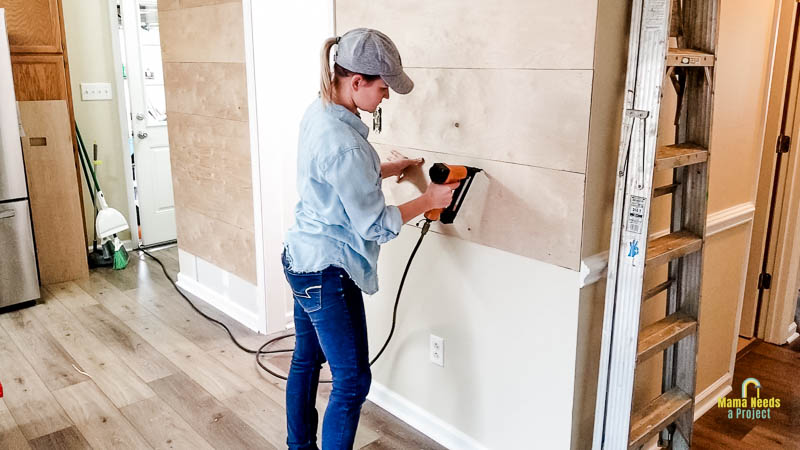
Try to line up your nails with the wall studs so that your planks attach more securely to the wall. To make sure you’re hitting the studs with your nail gun you can mark out the location of the studs before you start attaching boards.
I decided to butt our boards right up against each other, but I’ve seen many other people opt for a gap of about 1/8” between boards for a wood plank wall.
4. Cut out spots for outlets
As you’re attaching the wood planks to create your DIY modern shiplap wall you will probably need to go around outlets, light switches or doorways. The easiest way to cut out these spots is with a jigsaw.
For cut outs in the middle of a board first mark the rectangle that you need to cut out. Then, drill a hole inside the rectangle big enough for your jigsaw blade to fit in. Insert the blade and cut out the inside of the rectangle.
For outlets and light switches remember to make the cut out the size of the hole in the wall – not the size of the outlet cover.
5. Cover nail holes & seams
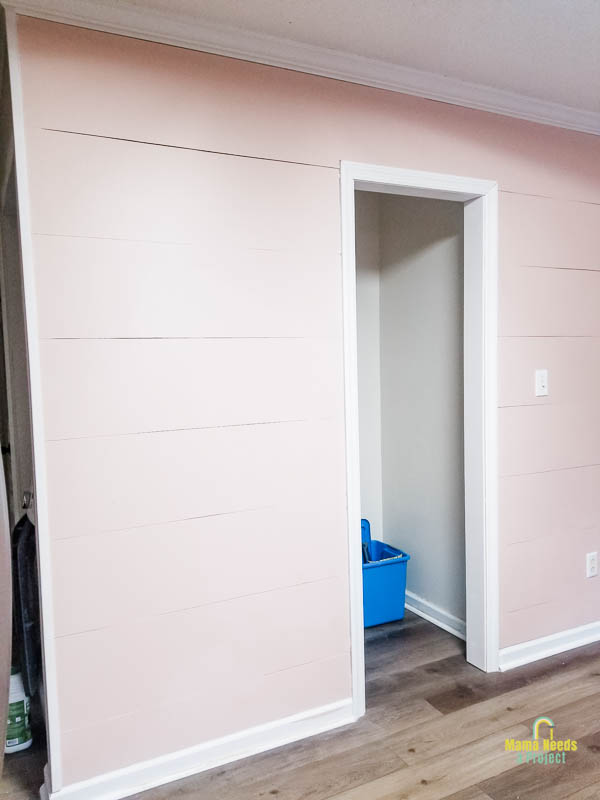
Once you have attached all of your DIY shiplap to the wall you can start covering up the nail holes and any seams with wood filler. I only had one seam at the top of my wall so I decided to fill it in with wood putty so that it looked like a single wood plank.
Once the wood filler dries sand it down so that the wood plank has a smooth surface. Then use a damp rag to wipe down all of the planks and remove any sawdust to get them ready for painting.
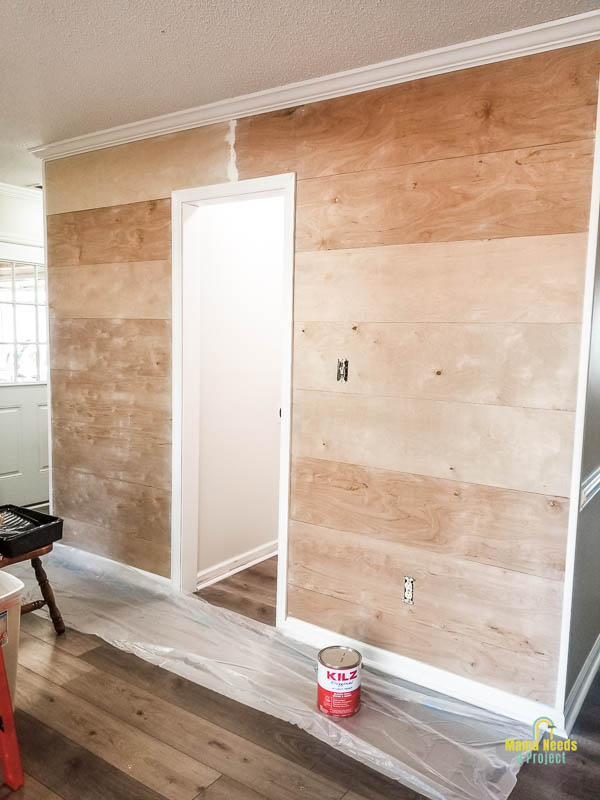
6. Prime & paint
Next, I primed my DIY shiplap wall with an oil-based, stain blocking primer. I chose to use a primer because I worried that without it any knots and heavy grainlines in the wood would eventually seep through the paint.
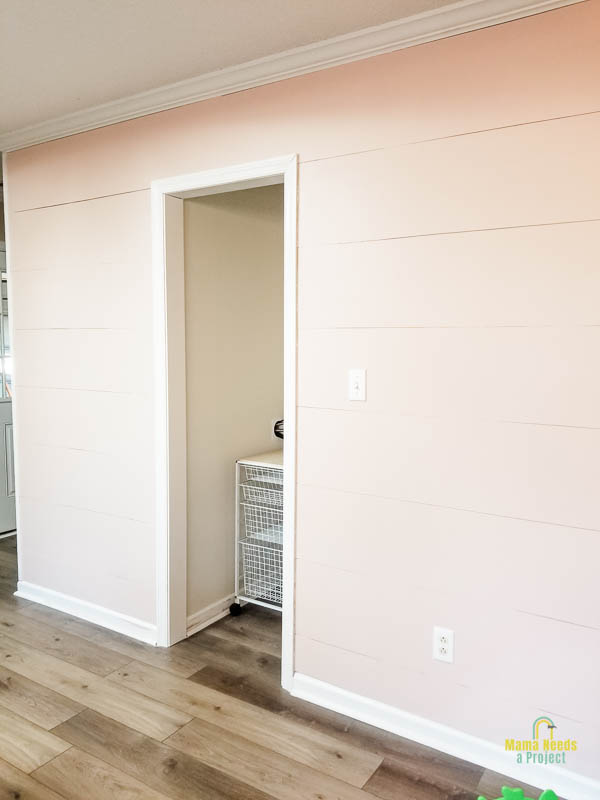
After the primer dried I lightly sanded it by hand with a sheet of 220 grit sandpaper. Then I painted 1-2 coats (I can’t quite remember how many) of regular interior house paint. I decided to paint our DIY modern shiplap wall a light pink color mostly because that was the paint I already had on hand. I could also picture it in a dark navy blue or a forest green.
A few questions about making a DIY modern shiplap wall
How do you modernize shiplap?
Can you really modernize shiplap? I think so! The version of shiplap that I did for my wall is probably more accurately just called a wood plank wall. To modernize the look of shiplap I made the planks much wider (12”), filled in seams between boards to make each plank the entire width of the wall and painted it a color other than white or a rustic wood stain.
All of these things take traditional, rustic shiplap and turn it into a modern wood planked accent wall.
Does shiplap go over drywall?
That’s what we did! One section of the wall where we installed our DIY modern shiplap was a wall we had just built and hung drywall on.
We put the DIY wood planks directly on the unfinished drywall. Because we didn’t leave any gaps in between our planks it’s not noticeable that the wall behind it is unfinished. If you were planning to leave a gap between your boards you should probably paint the drywall before installing your DIY shiplap.
Do you start shiplap from the top or bottom?
I definitely recommend starting at the top of your wall and working your way down. I recommend this because it’s very possible that your walls are not straight. Ours definitely weren’t! Starting at the top will give you a nice clean line at the top and then if you need to make any adjustments those will be at the bottom where they will be much less noticeable.
Also, if you need to trim the height of any wood planks it will look better to have the thinner board at the bottom of your wall instead of the top.
What is the cheapest way to do shiplap?
Our DIY shiplap wall cost less than $50! By using sheets of underlayment and cutting them down into planks we saved a lot of money. Each sheet of underlayment cost about $13 at the time we bought them.
What is the spacing between shiplap?
People usually space shiplap about 1/8” apart, but for our wall we butted the wood planks right up against each other.
How do you hide the edges on a shiplap wall?
To hide the edges of the wood planks on corners of our wall we added a small corner cover on top of the shiplap. We nailed to the wall using a finish nailer and then filled the nail holes with spackling and painted it white to match the trim. The covers hide the uneven edges of the wood planks and they also frame the wall.
DIY Modern Shiplap Wall
This wall is such a fun addition to our very boring house! It gives our kitchen some texture, character and a much needed personal touch. Making your own modern shiplap wall is super easy and affordable. I’d love to hear if you make one for yourself! Share your projects with me by tagging @MamaNeedsaProject on Instagram.