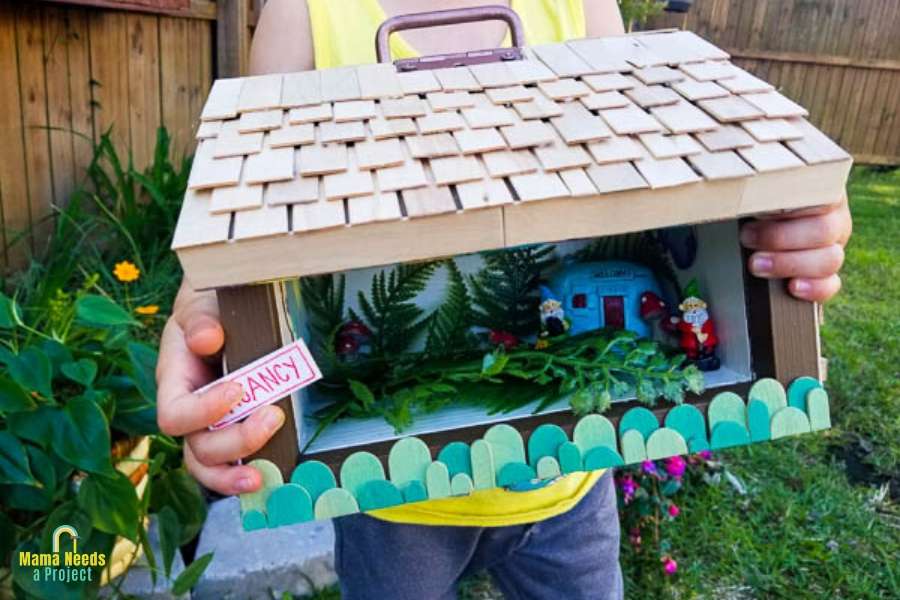
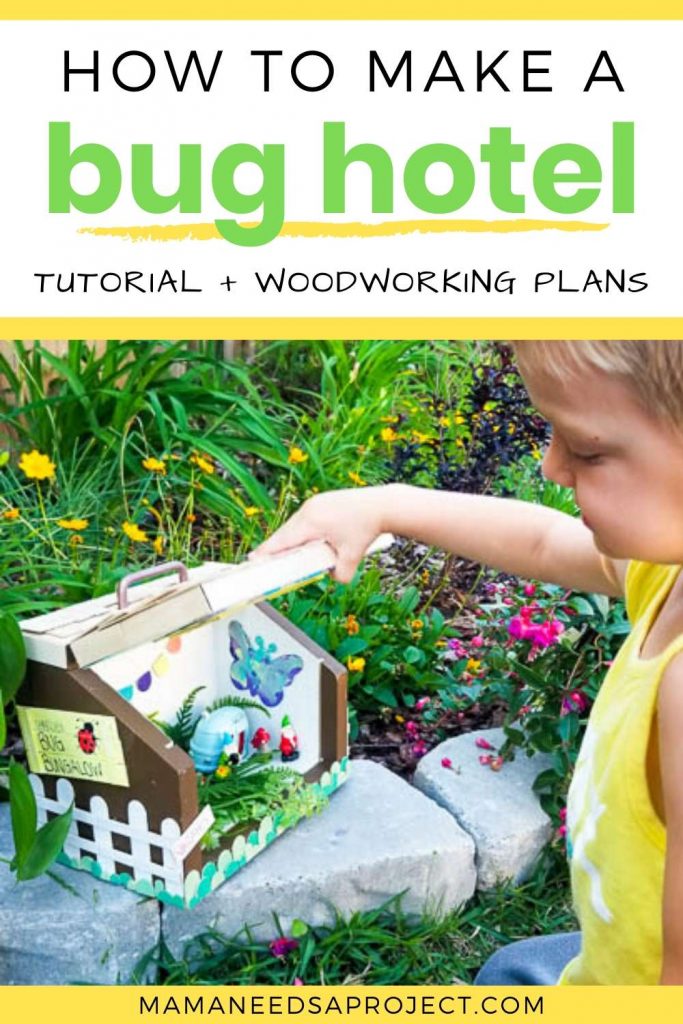
Charlie’s Bug Bungalow | DIY Bug House for Kids
Last week my son and I took a small pile of scrap wood and turned it into a DIY bug house fondly named Charlie’s Bug Bungalow. This cute little project was made entirely from things we already had on hand and it turned out SO ADORABLE!
Today I’m sharing with you some building plans and a tutorial for how I build this cute little DIY bug house that my son absolutely loves.
Save to Pinterest!
DIY Bug House Woodworking Plans
You can grab the printable woodworking plans for the this project in my woodworking plan shop.
All of the woodworking plans in my shop include a lumber list, cut list and supply list. They also feature digitally rendered images and detailed instructions that walk you through each step of the build. I use easy-to-understand language that’s perfect for beginners.
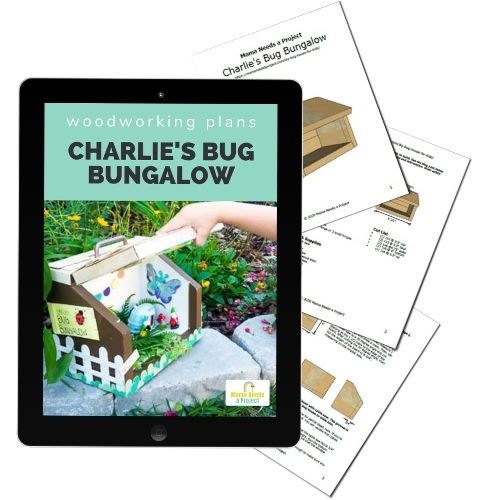
I’ll share a quick tutorial for this project here, but you can get the full details in the printable woodworking plans.
This post contains affiliate links.
What do you need to build a DIY Bug House
Supplies
- Printable Charlie’s Bug Bungalow Woodworking Plans
- scrap wood
- 29″ total of 1x3s
- 35″ total of 1×6
- 10″ total of 1×2
- miter saw
- drill
- sander
- table saw
- hinge – 1 large or 2 small
- drawer handle
- paint & wood stain
- wood screws
- wood glue
- popsicle sticks
- paint brushes
- hot glue gun
- wire cutters or other very sharp scissors to cut popsicle sticks
- large plastic food container – I’ll explain 🙂
Skill Level & Time
Building this DIY bug house was super quick. It probably took about an hour from start to finish. The part of this project that took the most time was decking out the house after it had been built. I did the decorations over a couple days, but it could definitely be done faster by someone who is more decisive than me.
This project uses basic, beginner woodworking skills. The only power tools you will be using are a drill, sander and miter saw. It’s perfect for beginners and a great project to get your kids involved in! My son “helped” hold the drill during assembly, but older children and teens could easily take on more steps on their own.
*I also use a table saw to cut grooves into the wood to add a front window. This step can totally be skipped if you don’t have access to a table saw or you’re not ready to use one. I hear open air bug houses are going to be all the rage anyways.
How to build a DIY Bug House
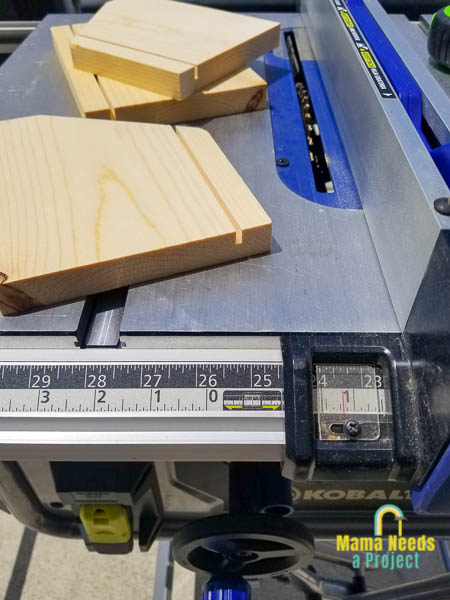
1. Cut your lumber
The first thing you’ll do is cut your scrap wood down to size. You can find all of the lumber dimensions in the woodworking plans.
I used a miter saw to cut all of my lumber. All of the cuts are 90 degrees except the sides of the DIY bug house that are cut at a 30 degree angle on one side.

2. Add a groove for the window
Once all of the lumber was cut down to size I used my table saw to cut a groove into the sides and base of the bug house. The groove is so that the front “window” can slide in and out easily.
This step is totally optional – you can easily skip adding a window to your bug house.
You will need to set up your table saw to allow for partial depth cuts. I first learned how to do this when making my Modern Wood Planter.
To allow for partial depth cuts you will need to lower the riving knife on your table saw. The riving knife is the piece of metal behind the blade that keeps wood separated while you are sawing. You can see me adjusting mine in the picture below.
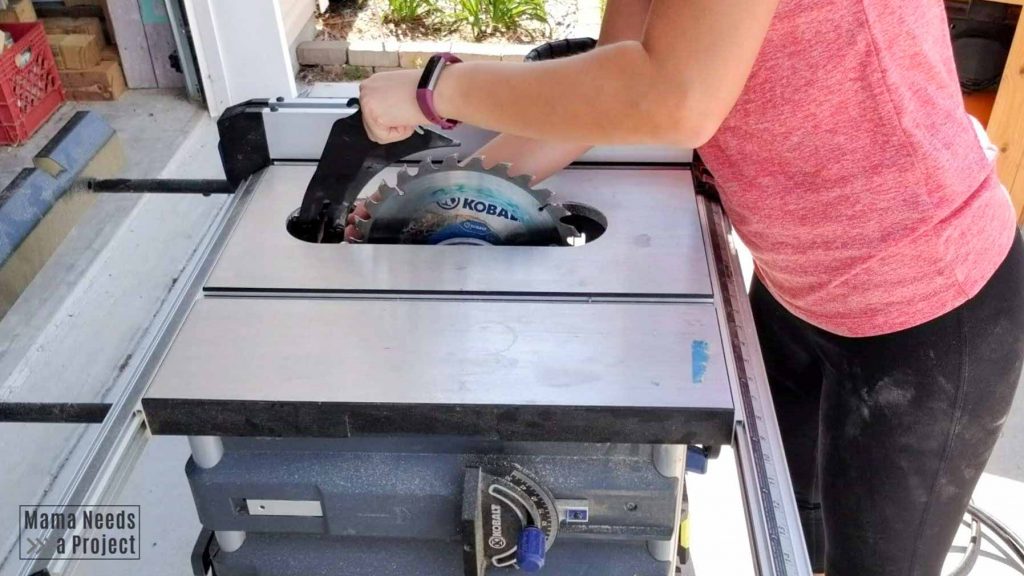
It’s pretty simple, but I did have to refer to my table saw manual to figure out how to do it. You might have to reference your manual, too. Most are online so just google it if you no longer have the manual.
Once your table saw is set up for partial depth cuts you can send the 2 side pieces and the bottom piece through to cut the groove for the window. I set my table saw fence 3/4″ from the blade and adjusted the blade to about 3/8″ height.
3. Sand & stain
Next I gave everything a quick sand and stained all of the pieces. I usually find that it’s much easier to stain projects before assembly. It’s easier to get full stain coverage and you don’t have to worry about wood glue getting in the way.
I used some outdoor stain that was left over from restaining our deck. This stain is super thick and dried really fast. I ended up later painting over the stain on the inside of the DIY bug house to make it brighter, but in the beginning I had no idea who I wanted to finish it. So everything got stain.
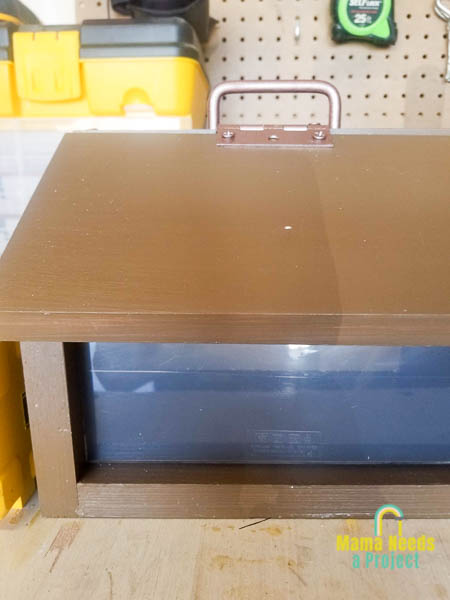
4. Assemble your DIY Bug House
After the stain has dried, it’s time for assembly. You can get all of the assembly instructions in the woodworking plans.
The DIY bug house comes together really easily using wood glue and screws.
Scroll down a bit and I share a few general building tips to help you with assembly.
5. Cut window
Once the DIY bug house is assembled, you can make the window insert for the front. My original plan was to purchase some plexiglass and cut it to size, but since at this time we’re still trying to maintain social distancing I searched around the house for something that could be used instead.
I landed on using a big, cheap plastic reusable container. I’m pretty sure this one came from the Dollar Tree. Some other ideas I had for supplies were a clear binder cover, heavy plastic dividers or glass from a cheap picture frame we no longer use. Any of these things would work, but I opted for the plastic container because the plastic was sturdy and honestly we just have too many of them. I was happy to see it go.
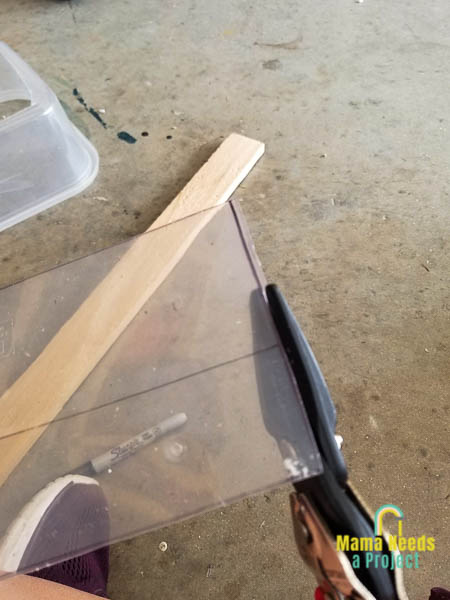
I measured out the size I needed the window to be and then traced it onto the plastic with a Sharpie. I used a pair of super sharp wire cutters to cut the plastic. Pruning shears should also work for this. Then, I poured some hand sanitizer on the plastic to wash off the Sharpie marks. (That’s a trick I learned working in a bookstore a looonngg time ago.)
I was worried that the edges of the plastic would be sharp so I went over them with a piece of sandpaper to dull them down. My original plan was to use a glue gun to glue around the edges of the window like caulking and keep it in place, but I like being able to remove it so I skipped that part. If I had used glass I probably would have gone ahead and secured it into place with the hot glue.
Adding the window is the last step for constructing your bug house! Next comes the fun part of decorating.
A Couple Tips for Building Your DIY Bug House
Always pre-drill your holes. I recommend pre-drilling each hole before you drill in your wood screws. Pre-drilling the holes will help to guide your screw into the wood and it will also help prevent the wood from splitting when the screw is inserted. I use this set of drill bits to pre-drill all of my holes.
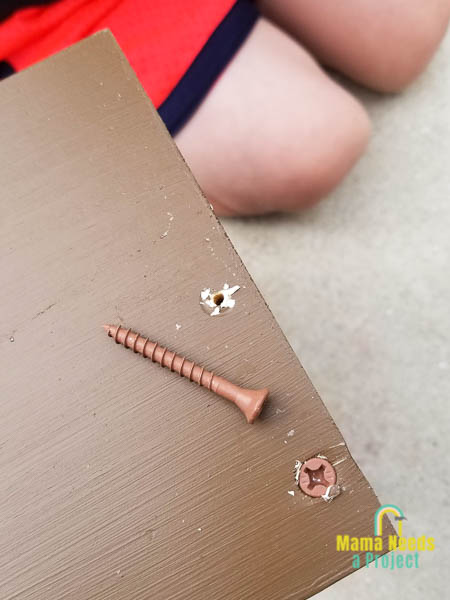
Use wood glue on every joint. Wood glue will create a stronger, longer lasting hold for your joints than screws alone. I use Titebond III because it’s rated for indoor and outdoor use. I’ve used it for years and never had any issues. Be sure to wipe any excess glue while it’s wet – it’s much easier to remove wet than after it dries.
Decorate your DIY Bug House
After constructing the DIY bug house, the real fun of decorating begins! Initially I didn’t plan on decorating it, but once I got started I just couldn’t stop. It was so fun to come up with little things to add.
DIY bug house decorations (LOTS of popsicle sticks)
All of the decorations I made for the DIY bug house are made from popsicle sticks. We had a big stash of them that I’d bought over time from the Dollar Tree for various crafts. I used big ones like these and regular sized ones like these.
To cut the popsicle sticks to size I used some super sharp wire cutters. The same ones I used to cut down the plastic for the window. You could also use pruning shears.
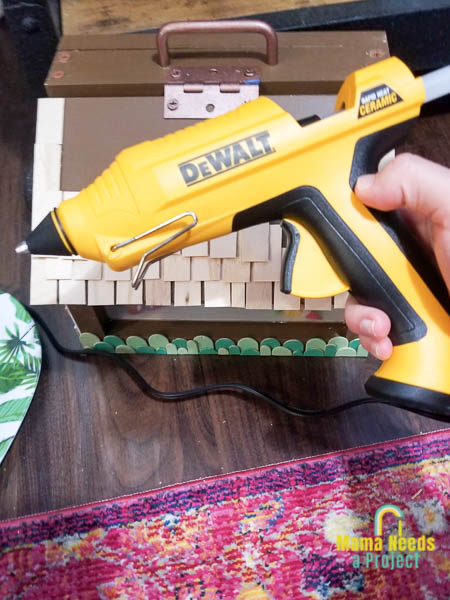
I attached them to the DIY bug house using a glue gun. I got this bigger Dewalt glue gun for Christmas and it’s been great! I haven’t burnt my fingers once since I started using it. I don’t know if that’s a testament to the glue gun or if I’m just smarter now.
I started by cutting some of the big popsicle sticks into fence posts and some little sticks for the cross boards. Then I cut the rounded tops off of a bunch of sticks to make some cute little grass. (You could also easily turn these into cactus!) Then I painted everything and glued it to the house.
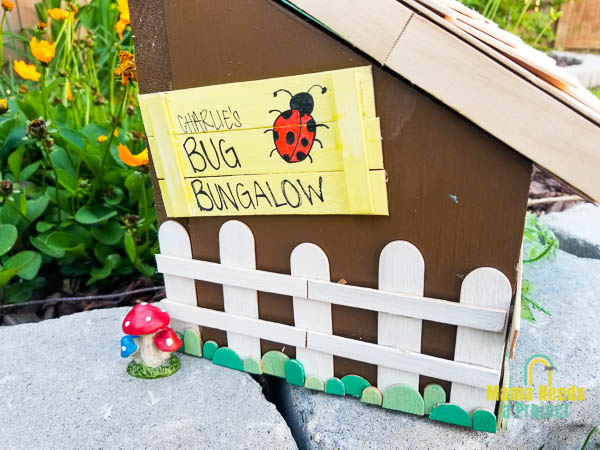
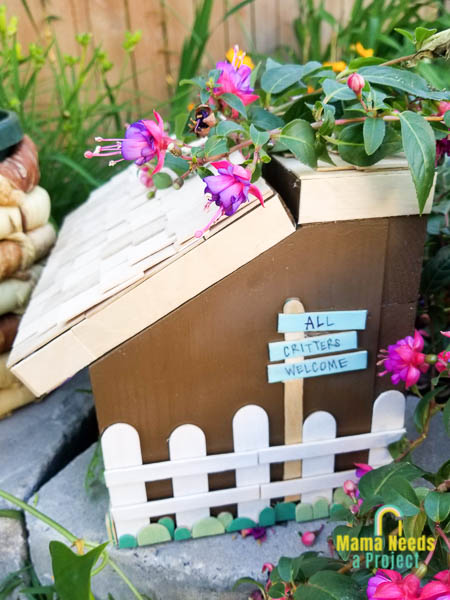
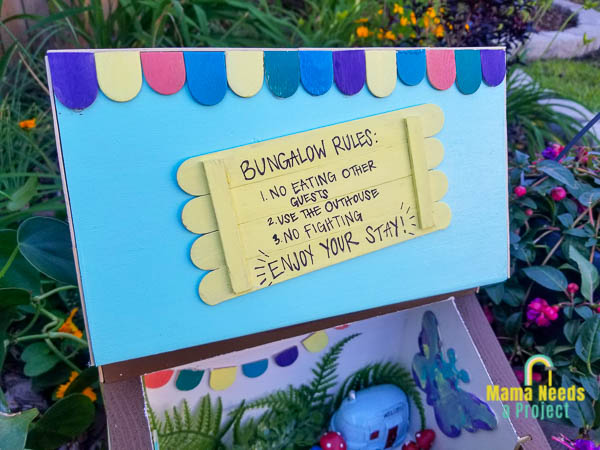
Next I added a few signs. It would have been easier to do these before the fence, but it all worked out.
Then came the roof. I’m a bit embarrassed to tell you how much time I spent on this. I got really into it and, well, soon I realized it was bedtime and I had forgotten to even make dinner. But Charlie didn’t complain about staying up late and eating pizza.
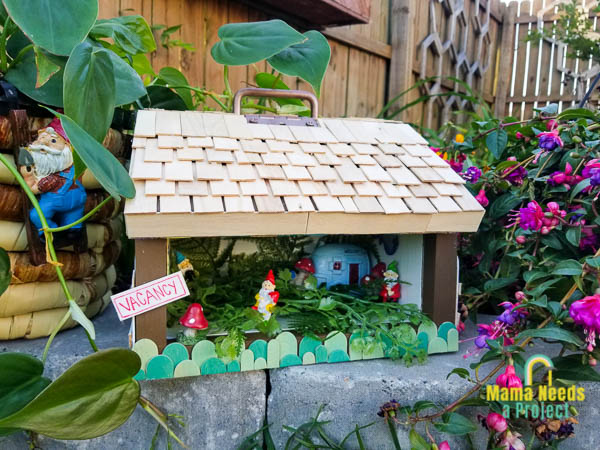
Decorate the inside
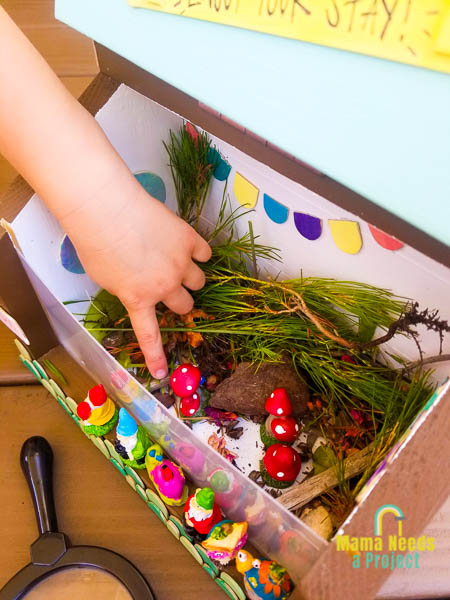
I ended up painting the inside white because the brown was just so dark and I just knew the bugs would appreciate a brighter palette for their stay. Charlie painted a butterfly and flower cut out to hang inside. You know how bugs like original artwork.
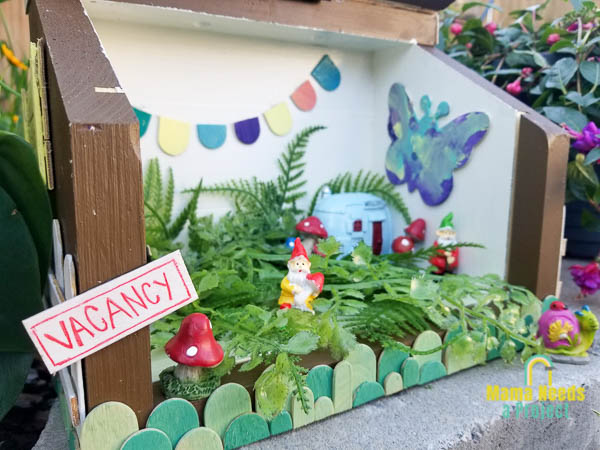
The last thing we added was a list of bungalow rules. Charlie helped me come up with these and I think they’re pretty funny.
Go on a Bug Hunt!
But first have a photo shoot 😉
Once I finally handed over the Bug Bungalow to my son it was time to scrap the cute set up and let him fill it up with whatever treasures he could find.
He found leaves, twigs and some dead flowers that he really thought the bugs would love. It was so fun watching him search around the yard for stuff to add.
Once he filled the bug house up he was on the hunt for bugs, complete with his magnifying glass. While we found a few, he was not cool with picking them up and putting them in the house – after all that work! So I just had to laugh. This was clearly a project that was more for me than him.
So instead of housing bugs, our DIY bug house is mainly for little gnomes and toy cars. And as long as he’s outside and enjoying himself he can fill it up with whatever he wants.
DIY Bug House for Kids
This DIY bug house was so much fun to make! It’s a quick scrap wood project that has already provided hours of entertainment for my son. I really enjoyed getting creative and adding all of the silly little details.

I want to hear from you!
Let me know what you think of our DIY bug house aka Charlie’s Bug Bungalow in the comments! And if you decide to make one of your own, please share it with me on social media. You can find me as @MamaNeedsaProject on Facebook and Instagram.
Happy Building!